
Mushroom spawn is nothing more exotic than a carrier colonized with living mycelium, and the whole game of home cultivation is moving that mycelium onto something bigger without letting anything else move in with it. Grain, sawdust, wooden dowels, wood chips, stacked log rounds — each is a different spawn format, and each pairs with a different inoculation method. Pick the wrong pairing and you either stall the run or hand the batch to Trichoderma.
I run every one of these on my bench in Sweden, from rye grain jars under the flow hood to an outdoor wine-cap bed that spreads a little wider through the wood chips every summer. Grain spawn is where most indoor growers live, but it is genuinely the worst choice for a hardwood log, and I have watched beginners waste a whole autumn trying to force it. This hub is the map: what each spawn type actually is, what it colonizes best, the inoculation method that matches it, and the linked deep-dives where I take each technique apart step by step.
Here is the honest through-line before we start. The place home growers lose a batch is almost never the fruiting chamber — it is the spawn and the transfer. Get the format right for your target substrate, keep the transfer clean, and read the spawn run correctly, and the mushrooms mostly take care of themselves.
What Is Mushroom Spawn, and Why Does the Format Matter?
Mushroom spawn is any material that has been fully colonized by mycelium so it can be used to inoculate a larger substrate — think of it as living seed. A quart of rye colonized in 12 to 16 days holds enough mycelium to run 5 to 10 pounds of bulk substrate. The format matters because mycelium jumps fastest onto material chemically similar to what it is already eating.
That single fact drives every decision on this page. Grain-loving strains sprint across more grain, which is why grain-to-grain transfer turns one jar into ten. But a wood-decomposing fungus like shiitake or lion’s mane wants lignin and cellulose, so a wood-based spawn — sawdust or a dowel plug — colonizes a log far faster and more reliably than grain ever will. The bridge material should already taste like the destination.
There is a moisture and contamination angle too. Grain is nutrient-dense and sterilized, which makes it fast but also the single most contamination-prone thing in the grow room — one airborne Trichoderma spore lands on a nutritious rye berry and it is off to the races. Sawdust and dowels are lower-nutrient and can be pasteurized rather than fully sterilized, which is exactly why they survive out in the messy world of a backyard log where a grain slurry would sour in a week. Every spawn choice is a trade between speed and resilience.
What Are the Main Mushroom Spawn Types?
There are six spawn formats worth a home grower’s time, and they sort cleanly by what they are meant to colonize. Grain and cardboard target indoor bulk substrate; sawdust, dowels, wood chips, and totem rounds target wood. The table below is the decision at a glance, and each format gets its own section and its own linked guide further down.
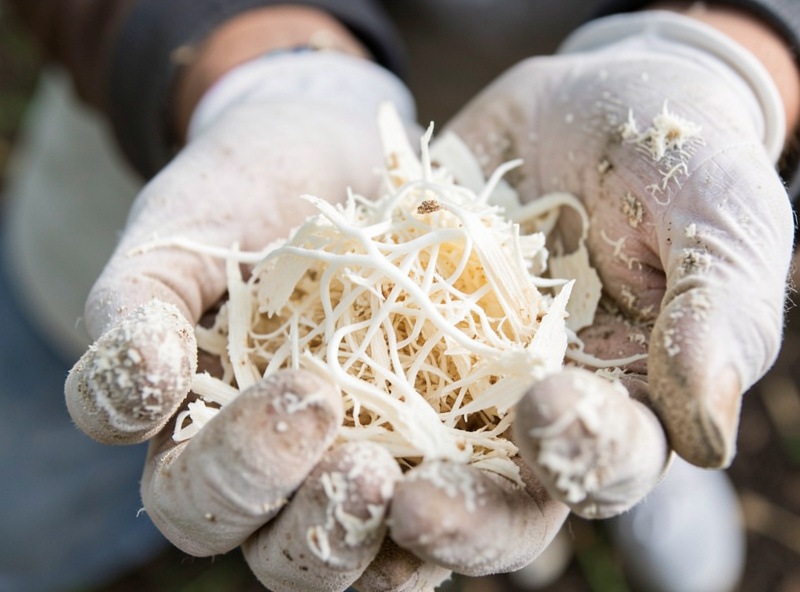
| Spawn type | What it colonizes best | Typical inoculation target | Colonization speed | Best for |
|---|---|---|---|---|
| Grain spawn (rye, millet, WBS) | More grain, then indoor bulk substrate | CVG, Masters Mix, straw, blocks | Fast (10 to 16 days per jar) | Indoor oyster, lion’s mane, king oyster |
| Sawdust spawn | Hardwood: logs, blocks, chips | Fruiting blocks, logs, outdoor beds | Moderate (2 to 4 weeks) | Shiitake, lion’s mane, outdoor wood work |
| Plug / dowel spawn | Solid hardwood logs | Drilled logs and rounds | Slow (6 to 18 months full run) | Shiitake, oyster, turkey tail on logs |
| Wood-chip spawn | Loose hardwood chips and straw | Outdoor garden beds | Moderate to slow (season to season) | Wine cap, king stropharia, elm oyster |
| Sawdust totem | Stacked log rounds (no drilling) | Cut hardwood rounds in a bag | Slow (several months to a year) | Oyster, lion’s mane on rounds |
| Cardboard spawn | More cardboard, straw, coffee | Low-tech oyster projects | Slow, low-yield but nearly free | Cheap oyster multiplication |
Notice the pattern: the grain-based formats at the top are fast and indoor; the wood-based formats in the middle are slower but survive outdoors for years. There is no universally “best” spawn — there is only the right format for your target substrate and species. For the two formats most people confuse, I wrote a full head-to-head in sawdust spawn vs grain spawn.
How Do You Choose the Right Spawn Type?
Choose spawn by two questions in order: what species am I growing, and what substrate am I putting it on? Match the spawn’s food to the destination’s food and you win by default. A wood-lover onto wood wants wood-based spawn; a fast indoor bulk grow wants grain. Everything else is detail.
Run it as a short decision tree. If your target is an indoor tub or block of oyster, lion’s mane, or king oyster, use grain spawn — it is the fastest carrier and the standard for a reason, and I break the prep down in the grain spawn and culture lab guide. If your target is a hardwood log or fruiting block, use sawdust spawn or dowel plugs, because they colonize lignin far better than grain and resist the outdoor contamination that would sour a grain slurry. If your target is an outdoor bed or a stump, use wood-chip or sawdust spawn broadcast in layers.
Budget and gear tilt the decision too. Grain spawn needs a pressure canner — no way around full sterilization for a nutritious grain. Sawdust spawn also wants sterilization for indoor blocks but tolerates pasteurization for rugged outdoor work. Dowel plugs and cardboard need almost nothing: a drill, some wax, a bucket. When someone messages me with no pressure canner and a pile of oak rounds, I point them straight at plugs or the totem method rather than a doomed attempt at grain.
Grain Spawn: The Indoor Workhorse
Grain spawn is colonized cereal grain — rye berries, millet, or wild bird seed — and it is the fastest, highest-vigor carrier for indoor cultivation. A pint of hydrated rye holds thousands of individual berries, and each one becomes an inoculation point when you break it up into bulk substrate, which is why grain gives the explosive early colonization that beats contamination to the finish.
The prep is where batches live or die. Grain gets hydrated to roughly field capacity — a berry that is plump but leaves no free water when you tilt the jar — then pressure-canned at 15 PSI for 90 minutes minimum, longer for larger loads. I run mine in an All American 921 stovetop canner because the metal-to-metal seal never fails me mid-cycle. Skimp on hydration and the grain either sits dry and never colonizes evenly or holds free water and breeds bacteria. My full method, including the rye-versus-millet call, is in grain spawn preparation, and the canner times and PSI mistakes are in how to sterilize grain spawn.
Once a jar is colonized, you have options. Break it into sterilized bulk substrate at a spawn-to-bulk ratio of about 1:2 to 1:4 (I dig into the numbers in spawn-to-bulk ratio), or expand it with grain-to-grain transfer to multiply your spawn before you ever touch bulk. The one hard limitation: do not try to run grain spawn directly into an outdoor log or bed. It is too rich, and outside the sterile chamber it turns into a bacterial buffet.
Sawdust Spawn: When the Target Is Wood
Sawdust spawn is supplemented hardwood sawdust colonized with mycelium, and it is the correct carrier any time your destination is wood — a fruiting block, a log, or an outdoor chip bed. Because it is already living on lignin and cellulose, it colonizes a hardwood log two to three times faster than an equivalent amount of grain, and it packs into drilled holes far better than loose berries.
I make mine from a Masters Mix base — 50/50 hardwood fuel pellets and soy hull pellets, hydrated and sterilized — the same formula I run for lion’s mane blocks and detail in the Masters Mix recipe. For pure log work I drop the soy supplement and run plainer supplemented sawdust, because a lower-nitrogen sawdust is more forgiving out in the weather where competitors are always circling. Sterilize sawdust spawn for indoor blocks; for rugged outdoor inoculation you can get away with pasteurization, though I still sterilize when I can.
The payoff of sawdust spawn is that it is the universal wood carrier: it fills drilled log holes, layers into an outdoor bed, packs between totem rounds, and inoculates a stump. When people ask which single spawn format to master after grain, my answer is sawdust — it opens up every wood technique on the rest of this page.
Plug and Dowel Spawn: Inoculating Solid Logs
Plug spawn is birch or beech dowels colonized with mycelium, and it is the cleanest way to inoculate a solid hardwood log. You drill a hole, tap a colonized dowel in with a hammer, seal it with wax, and the mycelium runs out of the dowel into the surrounding wood. It is slower to load than sawdust but nearly foolproof, which makes it the standard entry point for log cultivation.
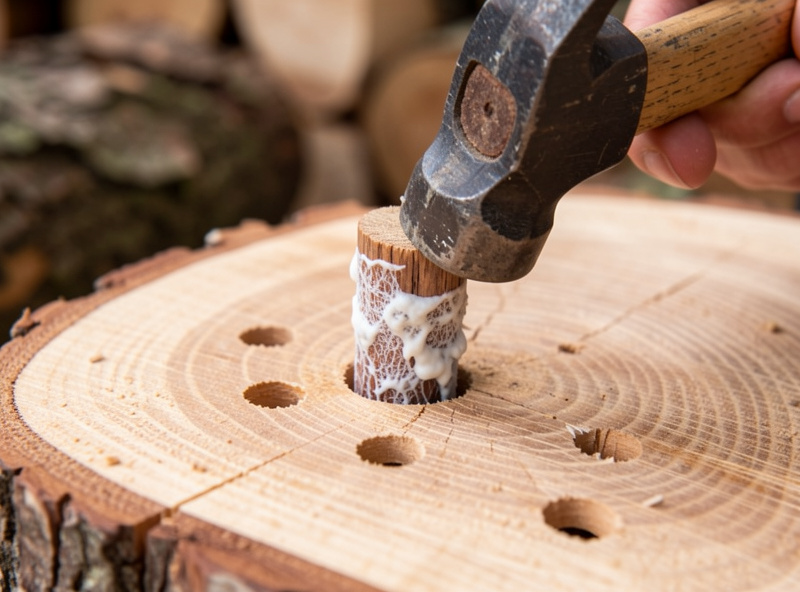
The geometry is not arbitrary. Standard dowels take a 5/16-inch (8 mm) bit, and the extension programs are consistent on spacing: a diamond pattern of holes roughly 6 inches apart down each row, with rows about 2 inches apart offset around the log. Penn State Extension’s shiitake production figures put a 40-inch log at roughly 40 to 50 holes, and that density is what lets the separate colonization fronts knit together before a competitor colonizes the end grain. I keep a dedicated angle-grinder adapter and a depth-collar bit so every hole is the same depth — my full drill, tap, and wax sequence is in working with plug spawn, and the wider log workflow is in the mushroom log inoculation guide.
Sealing matters more than beginners think. My first batch of shiitake logs I sealed with a paraffin candle I melted in a tin can, and by the next spring the brittle paraffin had cracked and flaked off every hole. The exposed dowels dried out, the run stalled, and I lost most of a winter. Now I use proper cheese wax or a food-safe soy wax kept just molten in an old crock pot, dabbed on hot with a foam brush so it actually bonds to the bark. Wax seals the inoculation site against drying and against invaders in one move — skip it and the log dries from every hole outward.
The Totem Method: Inoculating Rounds Without Drilling
The totem method inoculates cut log rounds by stacking them with a layer of sawdust spawn between each round, then bagging the whole stack so the mycelium runs across the flat cut faces instead of through drilled holes. It is the drill-free path to log cultivation, and it colonizes faster than plugs because the exposed end grain of a fresh cut is the easiest surface for mycelium to invade.
Mechanically it is simple: stand a bottom round on end, trowel on a half-inch to inch layer of sawdust spawn, stack the next round on top like a sandwich, repeat for two or three rounds, then slip the tower into a large clear bag to hold humidity while it colonizes in the shade. The end-grain contact is why it works — no bit, no wax, no hole geometry to fuss over. Field & Forest Products, who popularized the technique for home growers, run it hard for oyster and lion’s mane, and those are exactly the aggressive species I trust it with. My full stacking, spawn-layering, and un-bagging timeline lives in the totem method guide.
The one thing that ruins a totem is the wrong bag. My first attempt I used a black contractor garbage bag sealed tight, and inside a week the stack went slimy and sour — no fresh-air exchange, so bacteria won instead of mycelium. Use a breathable or loosely closed clear bag and set the totem in shade, never sun. Get that right and totems are the most beginner-forgiving log technique there is.
Stump Inoculation: Turning a Cut Tree Into a Patch
Stump inoculation converts a freshly cut hardwood stump into a semi-permanent mushroom patch by loading its cut face and drilled holes with sawdust or plug spawn. A stump holds far more wood mass than a log, so once it is colonized it can fruit for several years — it is the highest-yield, lowest-maintenance outdoor technique, provided you inoculate a fresh stump before wild fungi claim it.
Freshness is the whole battle. A stump older than a few weeks is already a contested apartment building of wild molds and yeasts, and your spawn will lose the turf war. On a fresh cut I drill the top face and sides in the same diamond pattern used for logs, pack the holes with sawdust spawn, sometimes trowel a spawn collar across the cut face under a shade board, and let the colonized wood do the rest. Species matters here — aggressive colonizers like oyster and certain wood-lovers take a stump far more reliably than a slow, fussy strain. The full outdoor workflow, species picks, and how I shade and mulch the stump are in inoculating a stump, and it pairs naturally with the siting logic in outdoor mushroom bed design.
Wood-Chip Spawn Runs for Outdoor Beds
A wood-chip spawn run inoculates loose hardwood chips by layering sawdust or wood-chip spawn through a garden bed, letting the mycelium “run” from chip to chip until the whole bed is colonized and ready to pin. It is the technique behind a self-spreading outdoor patch — a wine-cap bed inoculated once can widen a little every year as you top it up with fresh chips.
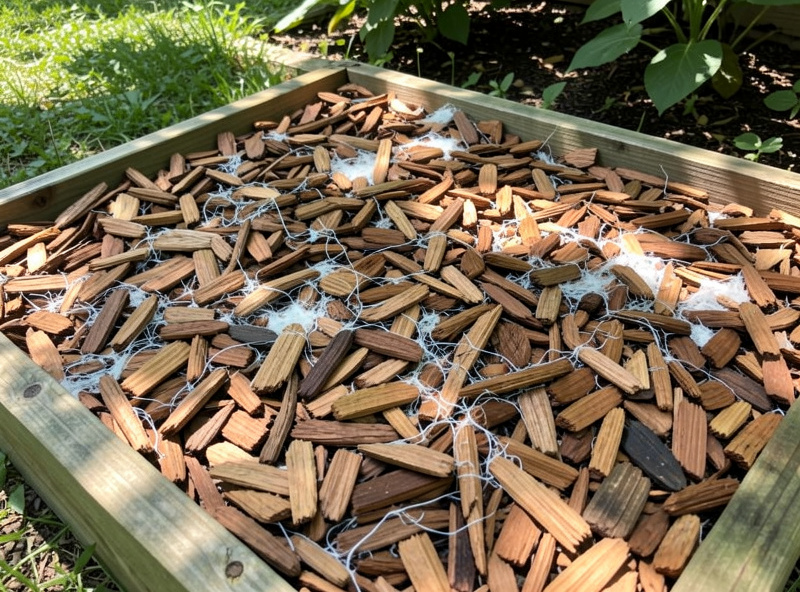
I run a wine-cap (king stropharia) bed in the garden built exactly this way, and it is the most rewarding low-effort mushroom I grow. You lay a few inches of soaked hardwood chips (sometimes cut with straw), broadcast a layer of spawn, add another layer of chips, and water it into field capacity. The spawn run threads through over a season, and the bed doubles as a garden path and a slug-managing companion planting — I cover that crossover in companion planting with mushrooms. The complete layering ratio, chip choice, and how I keep the run spreading are in the wood-chip spawn run guide, and the species-specific care is in growing wine cap mushrooms and my outdoor wine cap bed writeup.
Outdoor beds carry through winter better than most people expect. A well-mulched bed insulates its own mycelium, and I walk through overwintering a bed in overwintering mushroom beds. The broad backyard picture — siting, shade, and which species suit outdoor work — sits in the outdoor mushroom growing guide.
Which Inoculation Method Matches Each Spawn?
Every spawn format has one inoculation method it is built for, and mixing them is how runs stall. The method is dictated by the spawn’s physical form: loose grain breaks and mixes, packed sawdust fills and layers, rigid dowels tap into drilled holes. Use the format the way its shape wants to be used.
Grain spawn is broken and mixed into sterilized bulk substrate, or transferred grain-to-grain to multiply. Sawdust spawn is packed and layered — into drilled log holes, between totem rounds, or through a chip bed. Dowel plugs are drilled and tapped in a diamond pattern, then sealed with wax. Wood-chip spawn is broadcast in layers through loose chips. Cardboard spawn is sandwiched against fresh substrate. Get the pairing right and the mycelium has the shortest possible jump to make. The lowest-tech of all, colonizing corrugated cardboard to multiply oyster, is almost free — I lay it out in the cardboard spawn method.
How Do You Read the Spawn Run and Know Colonization Is Done?
A spawn run is done when the substrate is fully myceliated — uniformly white, knitted firm enough to hold its shape, and often just beginning to show the first hint of pins or a slight bruising of primordia. Colonization time varies enormously by format: a grain jar in under two weeks, a fruiting block in three to five, a hardwood log in 6 to 18 months. Rushing it is how beginners fruit into an under-colonized, contamination-prone substrate.
The read is visual and tactile. Healthy mycelium is bright white and rhizomorphic — ropey, reaching strands — not the diffuse gray “cobweb” look or any patch of green, blue-green, or black. I judge a grain jar done when there is no uncolonized grain visible and it “grabs” into a solid mass when shaken. A log is a slower read: you are waiting for the cut ends to show white mycelium and for the bark to loosen, and Cornell’s Small Farms Program figures put shiitake log colonization at roughly 6 to 12 months before the log will respond to a fruiting soak. If you cannot tell healthy from contaminated at a glance, study the healthy versus contaminated mycelium photo guide first, and I put the full timing signals per format in reading the spawn run.
There is a smell test I trust as much as my eyes. Crack a healthy colonized grain jar and it smells sweet and faintly of fresh mushroom — clean. A contaminated jar smells sour, like wet gym socks or old dishrag, and that bacterial or mold reek means the jar goes straight to the trash, never opened near my other spawn. The same clean-process instinct that protects the substrate is the one that protects the salami curing chamber and the sourdough starter three benches over — clean process across every microbial hobby is one discipline, not four.
Contamination Across Spawn Types
Every spawn format has a signature failure mode, and knowing which one you are fighting tells you whether to toss the batch or save it. Grain spawn fails to green Trichoderma and bacterial sour; sawdust and wood spawn fail more slowly to cobweb mold and competing wild fungi. Nutrient density predicts risk: the richer the spawn, the faster contamination moves.
Grain is the highest-risk format precisely because it is the richest — one Trichoderma spore on a nutritious berry can green a whole jar in 48 hours. That is why sterile technique at the grain stage matters more than anywhere else in the chain, and why I do all grain work on the flow hood, not just in the still-air box. Wood-based spawn is more forgiving: lower nutrients mean slower invaders, which is the entire reason dowels and sawdust survive outdoors where grain cannot. When a batch does turn, the triage rules are the same across formats — isolate it immediately, never open a suspect container near clean spawn, and when in doubt throw it out. The full diagnostic runs through the mushroom contamination guide.
One more consistency point worth stating plainly: the mistakes are cheap to make and cheap to avoid. Rushing a spawn run, sealing a log with the wrong wax, bagging a totem airtight, inoculating a stale stump — every one of those cost me a batch before it taught me the lesson, and every one is avoidable with the format-matched method above.
Putting It Together: A Spawn Plan by Goal
If you take one thing from this hub, take the pairing logic. Indoor tubs and blocks: grain spawn, broken into sterilized bulk. Hardwood logs: dowel plugs or sawdust spawn, drilled and waxed. Log rounds without a drill: the totem method. A fresh cut tree: stump inoculation. A spreading garden patch: a wood-chip spawn run. And whatever the format, do not fruit until the spawn run reads genuinely done.
What I would do starting today if I were new: master grain spawn indoors on oyster first, because it teaches you sterile technique and reading a spawn run on the fastest possible timeline, then graduate to sawdust and a single dowel-inoculated log so you learn wood work before you commit a whole autumn’s oak to it. Each linked guide on this page is the deep version of one step — build the skill in that order and you will not waste a season learning it the way I did.
What is the difference between grain spawn and sawdust spawn?
Grain spawn is colonized cereal grain like rye or millet, and it is fast and high-vigor, best for inoculating indoor bulk substrate. Sawdust spawn is colonized hardwood sawdust, which colonizes wood far better and is the correct carrier for logs, blocks, and outdoor beds. Match the spawn’s food to the destination: grain for indoor bulk, sawdust or dowels for wood.
Can I use grain spawn to inoculate an outdoor log?
No. Grain spawn is too nutrient-rich to survive outside a sterile chamber, and on a backyard log it sours to bacteria and mold before the mycelium can run. Use dowel plug spawn or sawdust spawn for logs and stumps, because their lower nutrient load resists the outdoor competitors that would ruin grain.
How long does a spawn run take to fully colonize?
It depends entirely on the format. A grain jar colonizes in about 10 to 16 days, an indoor fruiting block in 3 to 5 weeks, and a hardwood log in roughly 6 to 18 months. Do not fruit until the substrate is uniformly white, knitted firm, and free of any green or gray patches.
What size drill bit do I need for standard dowel plug spawn?
Standard mushroom dowels take a 5/16-inch (8 mm) drill bit. Drill the holes in a diamond pattern about 6 inches apart down each row with rows roughly 2 inches apart and offset around the log, then tap the colonized dowel in and seal it with cheese or soy wax.
Do I have to sterilize sawdust spawn, or can I pasteurize it?
For indoor fruiting blocks, sterilize supplemented sawdust in a pressure canner, because the added nitrogen makes it contamination-prone. For rugged outdoor inoculation of logs, stumps, and beds, a lower-nitrogen sawdust can be pasteurized and still win, since the outdoor spawn only needs to outcompete slower wild fungi.
Which spawn type is best for a beginner?
Grain spawn on oyster mushrooms is the best starting point indoors, because it teaches sterile technique and how to read a spawn run on the fastest timeline. Once that is solid, move to sawdust spawn and a single dowel-inoculated log to learn wood cultivation before committing a whole batch of logs.
Further Reading From the Grow Room
Each spawn technique in this hub has its own deep-dive, plus the substrate and contamination guides that back them up:
- Sawdust Spawn vs Grain Spawn: When Each One Wins
- Working With Plug Spawn: Dowels, Drilling, and Sealing
- The Totem Method: Stacking Logs to Inoculate Without Drilling
- Inoculating a Stump: Turning a Cut Tree Into a Mushroom Patch
- Wood-Chip Spawn Runs for Outdoor Beds That Spread
- Reading the Spawn Run: When Colonization Is Actually Done
- How to Grow Shiitake on Logs: Inoculation to Forced Flush
- Best Wood for Mushroom Logs: Oak, Maple, Birch Compared
- When to Inoculate Mushroom Logs: Seasonal Timing by Climate Zone
Authority references: Cornell Small Farms Program (shiitake log colonization research and figures) and Penn State Extension (shiitake production hole-count and spacing guidance).