
Mushroom contamination kills more home blocks than every other failure mode combined. After three years and roughly 90 inoculations, my contamination rate sits around 12 percent — and every one I traced back was a single missed step: bran not pressure-cooked long enough, gloves not sprayed between transfers, a grain jar with hairline pressure-cooker stress that let bacillus in. This guide is the systematic version of every lesson my failed blocks taught me.
The five contaminants you will meet at home are trichoderma (green mold), cobweb mold, pin mold (Rhizopus), bacterial wet spot (Bacillus subtilis), and aspergillus. Each one has a different visual signature, a different point of entry, and a different decision tree for whether to save the block or trash it. Get the ID right and your remediation path follows automatically. Misdiagnose a wet-spot bacterial bloom as cobweb and you will waste three weeks waiting for a block that was already lost on day one.
This guide assumes you already know what a healthy grow looks like and are troubleshooting a specific problem. If you’re still building that baseline, start with the visual-ID resources linked throughout rather than trying to memorise every contaminant at once — pattern recognition here comes from repetition, not from reading a single article closely. I still occasionally photograph an ambiguous patch and compare it against my own reference photos from a year ago before committing to a call, and I’ve been doing this for three years.
The Five Contaminants Every Home Grower Will Meet
The table below is my field reference taped to the inside of my tent door. Colour, texture, smell, and where on the substrate the growth appears are the four features that get you to a confident ID in under 60 seconds. Confidence matters because the action is binary — keep growing or trash and reset.
| Contaminant | Colour | Texture | Smell | Where It Appears | Save Block? |
|---|---|---|---|---|---|
| Trichoderma (Green Mold) | White then bright forest green | Dense, powdery | Faint coconut or musty | Anywhere — often substrate surface | No, trash immediately |
| Cobweb Mold (Dactylium / Hypomyces) | Pure white, fluffy | Wispy, web-like, fast | Faint dirty laundry | Casing surface, fruiting body bases | Maybe, isolate quickly |
| Pin Mold (Rhizopus / Mucor) | White then black pinheads | Hairy, vertical growth | Sharp, fermenty | Substrate surface, high moisture pockets | No, trash |
| Bacterial Wet Spot (Bacillus subtilis) | Yellow, grey, or clear slime | Wet, slick, sticky | Rotten meat, sulphur | Inside grain jars, near lids | No, trash |
| Aspergillus | Yellow, green, or black powder | Powdery, settled | Earthy, mushroom-like | Anywhere — often air-borne | No, trash with PPE |
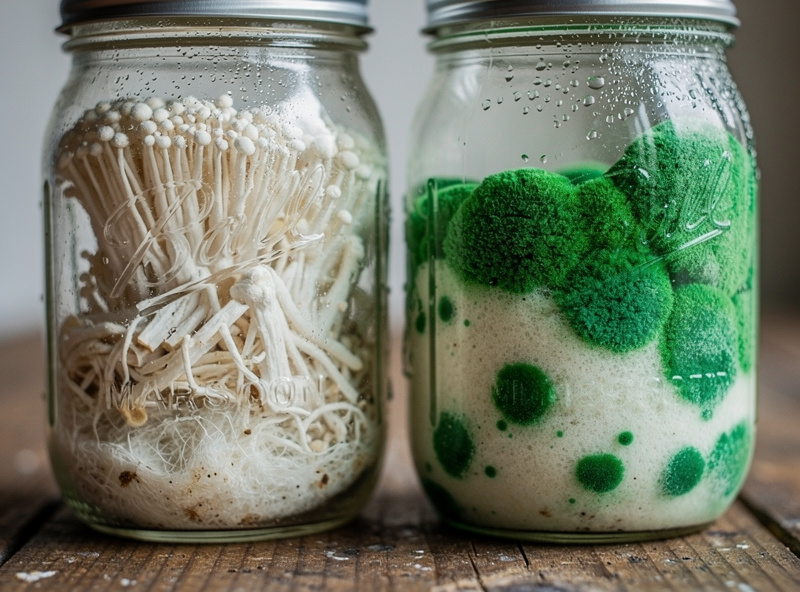
One species deliberately not on this table is healthy mushroom mycelium when it first colonises grain — fluffy, white, and easy to mistake for cobweb mold. Side-by-side comparisons are the only reliable training. The full visual reference set lives in my what does mycelium look like guide and the head-to-head photo set in cobweb mold vs mycelium.
Where Contamination Comes From: Five Entry Points
Every contamination event enters through one of five gates — substrate, air, hands, tools, or stock. Knowing which one let trichoderma in tells you exactly which step in your workflow to harden next time. My personal rule: when a block fails, I write the entry point on the bag with a marker before I trash it, and I review the entry-point tally every month.
Substrate is the highest-leverage entry point. Under-pasteurised bran is the single most common trichoderma carrier in home setups; bran needs 60-90 minutes at 15 PSI to reliably sterilise, not the 30 minutes most beginner guides suggest. The next-most-common substrate failure is too-wet hardwood sawdust — field-capacity is a squeeze that releases two or three drops, not a stream. Air comes second: every time you open a fruiting tent, you draw in airborne spores. I now do all transfers in a still-air box and have moved the tent away from the laundry room (Aspergillus loves lint). The full pressure-canner walkthrough — PSI targets, hold times, and the common mistakes that let Bacillus through — is in the sterilize grain spawn guide.
Hands are the third gate and the easiest to fix — alcohol gel before every glove change, gloves changed between every grain jar, no street clothes during transfers. Tools are gate four — scalpels alcohol-dipped and flame-sterilised between each transfer, inoculation loops glowing red between cultures. Stock is the fifth and the hardest to diagnose: contaminated liquid culture or agar transfer can carry an invisible bacterial load that only blooms after grain colonisation begins. I now mother-slant every species onto agar and check for clean growth before propagating to LC. The agar workflow — medium preparation, pouring, transfer technique, and reading plates for clean versus contaminated growth — is covered step by step in the mushroom agar plate guide.
Visual ID: Healthy Mycelium Versus Common Contaminants
Healthy fully-colonised grain looks like uniform white fluff with a slight ropy texture, no off-colour patches, and a faint mushroom smell. Anything else is suspect until proven otherwise. My specific tells: healthy mycelium grows in a knotted, rope-like front; trichoderma grows in a flat, even mat that turns green from the centre outward; cobweb grows fast and wispy, climbing vertically off the substrate; wet spot pools at the bottom of grain jars and looks like cooking grease.
Smell is your second sense and the most underused. Open a successful jar — clean mushroom, faintly fungal, slight earthy note. Open a contaminated jar — and you will know within a second. Bacterial wet spot smells like a packed-lunch tuna sandwich left in a hot car. Pin mold smells like apple cider gone wrong. Aspergillus on grain has a sharp, sweet, sour-cherry note. Train your nose by smelling a known-clean culture daily; you will spot the deviation faster than your eyes can confirm it.
If you only have time to learn one ID skill, learn trichoderma. In my own three years of logs it’s the contaminant I’ve reached for the trash bag over more than any other combined — I don’t have a controlled study to hand you a clean fleet-wide percentage, but the pattern matches what most cultivation forums and suppliers report: it’s the one every beginner meets first, it spreads fast, and it ruins neighbouring blocks if you do not isolate. A peer-reviewed review of Trichoderma green-mold detection confirms the white-to-green sporulation colour shift as the reliable visual signature, which lines up with what I watch for on my own blocks. Detailed visual guide and remediation are in my green mold in mushroom grow article.
Trichoderma: The Most Common Disaster and How to Beat It
Trichoderma is a soil-borne mold that thrives in the same conditions as mushroom mycelium and outcompetes most cultivated species above 22 C. It starts white — which is why beginners miss it — then turns brilliant green from the centre as spores mature. By the time you see green, billions of spores are already in the air around the block.
Prevention is the only meaningful intervention. The four hardening steps that reduced my trichoderma rate from 25 percent to under 5 percent: pressure-cook all bran and grain additions at 15 PSI for 90 minutes (not 60, not 30 — 90); cool substrate fully before inoculation, ideally overnight in a clean room; reduce fruiting tent temperature to 18-22 C for species that tolerate it; use a fresh liquid culture from agar every 30 days, no LC-to-LC propagation. Add the CVG bulk substrate workflow on top — coco coir’s lower carb content discourages green mold compared to straw or sawdust alone.
If you see green on a block, double-bag the block, take it outside, and dispose of it sealed. Do not open the bag in your grow space. Wipe every surface in the tent with 70% isopropyl alcohol, replace the substrate trays if they were wood, and run the tent at 25 C for three days to dry out any remaining spore reservoir. New inoculations go on hold for two weeks while the room recovers.
Cobweb, Pin Mold, and Bacterial Wet Spot
Cobweb mold is the contamination beginners most often confuse with healthy mycelium. The difference: healthy mycelium grows in a knotted, three-dimensional rope structure with a creamy white colour; cobweb grows as flat, fast, wispy strands that look like an actual spider web stretched across the casing surface. Cobweb doubles in visible size every 12 hours; healthy mycelium takes 24-48 hours to make a similar visible jump. If you catch cobweb early, spraying the affected zone with 3% hydrogen peroxide and a small amount of salt can sometimes halt it. If it is on more than 30 percent of the surface, trash.
Pin mold (Rhizopus and Mucor) is unmistakable once it sporulates — black or grey pin-heads on tiny hyphal stalks. It loves overly wet substrate. Trash immediately; the spores are extremely airborne. Bacterial wet spot is the gnarliest of the five — it forms inside grain jars, often near the lid, as a slick yellow or grey film with a strong rotten smell. Wet spot means your grain was either under-cooked, over-soaked, or contaminated by water that condensed on the jar lid during cooling. Trash the jar, sterilise the canner, and pre-soak grain less aggressively next round. The full bacterial contamination breakdown — wet spot vs sour jar diagnosis, odour tells, and whether the grow space itself needs decontaminating — is in the bacterial contamination mushroom guide.
For diagnosing borderline cases I rely on the hygrometer placement guide — many wet-spot and pin-mold cases trace back to a misplaced humidifier output that kept one corner of the tent at 100 percent RH. The same diagnostic discipline I use here is what’s covered in fermentfoundry’s kahm yeast vs sauerkraut mold guide; the visual training transfers almost one-for-one between fermentation and mycology.
Aspergillus is the one contaminant on this list I treat differently from a pure “trash it” nuisance — it’s the only common home contaminant with a real, sourced health concern rather than just a lost block. Some Aspergillus strains are documented producers of mycotoxins, and disturbing a sporulating colony (scraping it, agitating the bag while sealing it) throws spores into the air you’re standing in. A peer-reviewed review of indoor Aspergillus exposure covers the respiratory-hazard case for why I don’t treat this one casually: N95 mask on, nitrile gloves on, bag it without agitating it open first, and take it straight outside. Every other contaminant on my table is a growing-technique problem; Aspergillus is a growing-technique problem with a genuine health-and-safety layer on top.
Sterile Technique That Works in a Home Kitchen
You do not need a laminar flow hood. A still-air box (clear plastic tote, two arm holes, gloves) is sufficient for liquid culture work, agar transfers, and inoculating bulk substrate up to about 10 transfers per month. My SAB build cost 18 dollars: a 60-litre clear tote, two 4-inch hole-cuts, two pairs of nitrile gloves taped to the rims, and a small alcohol spray bottle inside.
Inside the SAB: spray everything down with 70% isopropyl, wait 60 seconds for evaporation, then work slowly. Slow movement matters — fast movement creates air currents that mobilise spores. I move at half my normal pace and have never regretted it. For tool sterilisation, I keep a glass test tube of 99% isopropyl in a beanbag stand and dip-flame-cool the inoculation loop or scalpel between every transfer. The flame cone goes red — that is the sterilisation temperature.

If you want to compare SAB to flow hood and decide what your home setup actually needs, the breakdown is in still air box vs flow hood. For most home growers, a SAB plus disciplined hand-and-tool hygiene gives you the same contamination rate as a low-end flow hood at 10 percent of the cost.
When to Save a Block and When to Trash It
The save-or-trash decision is binary and time-sensitive. Trichoderma, pin mold, aspergillus, and wet spot are always trash — no exceptions, no heroic interventions. Cobweb is the only contamination with a real save path, and only if you catch it before it covers more than 20 percent of the casing surface and only on bulk substrate (not on grain spawn — never try to save contaminated grain spawn).
My cobweb save protocol: spray the affected area with food-grade 3% hydrogen peroxide and a pinch of non-iodised salt dissolved in the spray bottle (1 teaspoon per litre); drop tent temperature 2 C; increase FAE for 24 hours to dry the casing surface slightly; return to fruiting conditions and watch hourly. Success rate in my experience: about 50 percent. If it bounces back within 48 hours, the block is salvageable and you can usually pull a partial flush. If it does not, trash.
Trashing a block correctly is its own skill: double-bag immediately, seal, take outside to an outdoor bin (not the kitchen bin), wipe surfaces, and pause inoculations for one week. The pause matters — a single contaminated event raises baseline spore counts in the grow room for several days, and starting a new block into that environment guarantees the same outcome.
The hardest part of this decision isn’t technical, it’s psychological. A block represents real time and real money — a supplemented hardwood block is 6 to 9 dollars and two to three weeks of colonisation you’ve already sunk before you ever see a problem. The instinct to try one more thing, wait one more day, is strong, and it’s the instinct that costs you the most in the long run, because a marginal block held too long doesn’t just fail on its own — it seeds the next failure in whatever’s sharing air with it. I’ve made peace with treating the sunk cost as genuinely sunk: the moment a block crosses from “maybe” to “probably,” the decision is already made, and any time spent deliberating after that point is just time the spore count in the room keeps climbing.
Species-Specific Contamination Risk: What I’ve Noticed Across Six Species
Not every species carries the same contamination risk, and treating them as interchangeable is a mistake I made early on. This is drawn from my own logs across the gourmet and medicinal species I grow — see the full species rundown in my medicinal mushrooms home cultivation guide — not a formal comparative trial.
Oyster is the most forgiving by a wide margin; it colonises fast enough to outrun most airborne contamination before it gets a foothold, which is exactly why it’s the gateway species I point beginners to. Lion’s mane is a slower coloniser and noticeably more contamination-prone in my logs — the extra week or two of open colonisation time is extra time for a slow trichoderma creep to get established, which is part of why my lion’s mane growing parameters guide leans so hard on sterile substrate over pasteurised.
Reishi is the slowest of everything I grow and, unsurprisingly, the species where I’ve lost the most blocks to contamination outright — a 21-to-35-day colonisation window is a long time for a single weak point in technique to get exploited. Cordyceps militaris runs on cooked rice in jars rather than bulk substrate, and because that medium is so nutrient-dense, any contamination that does get in moves fast; the flip side is the sealed-jar format gives fewer entry points than an open bulk-substrate bag, so in my experience it’s actually a lower-contamination species than reishi despite the richer medium. Maitake sits in the middle — moderate risk, but the dense, heavily supplemented block I run for it means a save is almost never possible once something takes hold, so for maitake specifically I’ve stopped even attempting cobweb rescues and just trash on sight.
Building a Contamination Log That Actually Teaches You Something
The tracking sheet I mentioned above is the single highest-leverage thing I’ve added to my workflow, and it costs nothing but a few minutes per failed block. Four columns is all it takes: date, species, suspected entry point (substrate, air, hands, tools, or stock), and any environmental variable that was off-spec that week (room temperature, a humidifier that ran dry, a new bran supplier). I keep it as a plain notebook beside the tent rather than a spreadsheet, because the friction of walking to a computer means I’d skip logging on a bad day, and the bad days are exactly when the data matters most.
What the log gives you that memory doesn’t is pattern visibility across a timescale longer than your attention span holds. I didn’t notice that my failures clustered in warm months until I had thirty-plus data points to look back over — no single failed block would have told me that story, and I would have kept blaming “bad luck” or a specific bag of substrate instead of the actual lever, which was work-room temperature during the hottest weeks of summer. If you only take one thing from this guide, take the log, not the specific PSI numbers or hydrogen peroxide ratios — those are inputs you can look up again; the pattern-recognition habit is the part that actually compounds over time.
Recovery Protocols and Workflow Hardening
After every contamination event, I run a recovery protocol before the next inoculation cycle. Step 1: wipe the entire grow room with 1:10 bleach, ventilate for 24 hours, then run a HEPA air purifier on high for 48 hours. Step 2: pressure-cook the canner and all transfer tools at 15 PSI for 60 minutes — your equipment can carry spores between cycles. Step 3: re-evaluate which entry point caused the failure and harden that specific step. Step 4, the one I skipped for the first year and regretted: replace anything porous that was in the room during the event — cardboard, fabric, unsealed wood shelving. Spores embed in porous surfaces in a way that bleach wiping doesn’t fully reach, and a grow room that keeps “randomly” recontaminating months after a clean-up is usually still hosting spores in something soft or unsealed that never got swapped out.
The biggest unlock for me was treating contamination as data instead of failure. Every failed block goes in a tracking sheet with date, species, suspected entry point, and any environmental variable that was off-spec. After the first 30 inoculations I could see patterns no individual block would have revealed — for example, my contamination rate doubled in months when room temperature exceeded 24 C, telling me that climate control of the work-room (not just the tent) was a bigger lever than I had assumed.
If you keep getting trichoderma despite tight technique, the substrate is almost always the culprit; review the substrate quality decisions in coffee ground substrate and best wood for mushroom logs. If you keep getting wet spot, your grain prep is the gate to fix — soak shorter, dry harder, and pressure-cook to a true 90-minute hold. And if cobwebbing keeps appearing on casings, your FAE schedule is letting humidity stagnate; the build improvements in 3D-printed monotub lids and filter patches were what finally fixed mine.
Three Specific Failures That Changed How I Work
The first was a full batch of 12 oyster mushroom blocks that went green on day 14 of incubation. Tracing back, I had bought a 25-kilogram sack of bran from a different supplier that month — the supplier’s bran was milled in a facility that also handled animal feed. New rule: bran from a dedicated organic source only, pressure-cooked twice before use.
The second was a slow trichoderma creep on a reishi block that I ignored for three days hoping it was “just slow myc”. By the time I acted, four neighbouring blocks were contaminated. New rule: any suspicious patch gets photographed immediately and the photo gets compared to my ID reference within 30 minutes. If the answer is “maybe”, isolate the block. If the answer is “probably”, trash. I no longer give a contamination the benefit of the doubt.
The third was a perfect-looking lion’s mane block that pinned, fruited, and yielded 480 grams of beautiful primordia — then went green on day 4 of the second flush. The block had been fine; my fruiting tent surfaces had not been wiped between flushes. New rule: every flush is treated as a new run, including a full surface wipe between flushes. This single change brought my second-flush yields from “occasional” to “reliable”. Detailed mistake-tracking lives in mushroom growing mistakes; treat the contamination column as the diary I wish I had kept on day one. One category that logs separately from mold: pest pressure. Fungus gnats are the most common insect contaminant in home grows and their larvae damage substrate and emerging pins; the full prevention and control protocol is in the fungus gnats mushroom control guide.
Frequently Asked Questions
What does trichoderma look like at the very start before it turns green?
Early trichoderma forms a flat, dense, even white mat — distinct from healthy mycelium which grows in a knotted, ropy, three-dimensional structure. The clearest tell is texture: trichoderma mats are smooth and uniform; mushroom mycelium has visible ‘rhizomorphs’ or rope-like strands. If the colour stays pure white for more than three days without ropy texture, suspect trichoderma.
Can I save a contaminated mushroom block?
Only cobweb mold on bulk substrate is potentially salvageable, and only if caught early (under 20 percent surface coverage). Trichoderma, pin mold, bacterial wet spot, and aspergillus require immediate disposal — no save path is reliable. The cost of trying to save a doomed block is contamination of every other block in the same space.
Is contaminated mushroom mycelium dangerous to handle?
Aspergillus is the only common home contaminant with a real health concern; some Aspergillus strains produce mycotoxins. Always wear a N95 mask and nitrile gloves when disposing of contaminated blocks, especially if green or black powder is present. Trichoderma and cobweb are not toxic to handle but their spores spread aggressively to other blocks.
How long should grain spawn take to fully colonise?
Healthy lion’s mane, oyster, or reishi grain spawn colonises in 10 to 18 days at 22 to 24 C, depending on inoculation rate and grain type. If a jar shows no visible growth at day 7, suspect a failed inoculation or contamination. If colonisation stalls at 60 to 80 percent, suspect bacterial wet spot or a low-vigour culture.
Do I need a flow hood to avoid contamination at home?
No. A still-air box made from a 60-litre clear tote with two arm holes is sufficient for liquid-culture work, agar transfers, and inoculating bulk substrate up to about 10 transfers per month. A flow hood only becomes worthwhile when you run more transfers than that, or when you are working with very contamination-sensitive species.
What is the single most effective thing I can do to lower my contamination rate?
Pressure-cook all bran and grain additions at 15 PSI for a full 90 minutes (not the commonly cited 30 to 60). Under-cooked bran is the single largest carrier of trichoderma into home setups. This one change reduced my personal contamination rate from 25 percent to under 5 percent.
Why did my block go green on the second flush after a perfect first flush?
A clean first flush doesn’t mean the environment stays clean. The most common cause is fruiting-tent surfaces that weren’t wiped down between flushes — spores from the first flush’s dying mycelium or ambient air settle on the tent walls and shelving, then colonise the fresh cut surface of the block during the second colonisation push. Treat every flush as a new sterile-adjacent event: wipe the tent surfaces with 70 percent isopropyl between flushes, not just at the start of a new block.