
The best hygrometer for mushroom growing is a digital combo unit accurate to within 3% relative humidity, with a wired probe so the readout sits outside the fruiting chamber. Govee Bluetooth, ThermoPro TP50, and Inkbird IBS-TH2 lead the 2026 picks at $12-25, all calibratable with a salt slurry test, all logging trends.
Hygrometer choice sits inside a broader climate-sensing and climate-control stack; the rest of the kit (humidifier, FAE fan, smart plugs, automation) is in my mushroom growing equipment guide.
Humidity is the single most miscalibrated number in home mycology, and I learned that the hard way — I lost a lion’s mane flush early on trusting a hygrometer I never bothered to check against anything. Most beginners trust whatever number their hygrometer shows for the entire grow, then wonder why pins abort or fruits split. Cheap unit drift is real — the tiny mini-hygrometers shipped with grow kits routinely read well off true humidity right out of the package. The fix is two-part: pick a model with replaceable batteries and an exposed sensor, then verify it with a salt test before every new tub.
Why Hygrometer Accuracy Matters More Than Model
A 5% humidity error in the 90-95% RH fruiting range turns the difference between healthy primordia and aborted pins. Mycelium colonizes happily across 75-95% RH, but fruiting bodies are far more sensitive. Most aborts diagnosed as “low FAE” are actually undetected humidity drift from a hygrometer that drifted 8% over a few months. When FAE genuinely is the problem — long-stem syndrome, slow pin initiation, stalled second flushes — the FAE and CO2 in mushroom fruiting guide covers the CO2 target numbers, hole sizing, and passive versus active fan strategies for monotubs and Martha tents.
The accuracy bands worth knowing for fruiting:
- ±5% RH: Acceptable for spawn run. Mycelium tolerates a wide humidity band, so a cheap analog or unverified digital works.
- ±3% RH: Required for fruiting most species. Below this you cannot reliably hold pin-friendly conditions.
- ±1-2% RH: Lab-grade. Not necessary at home, but the calibration check confirms your fruiting unit is in the ±3% band.
Cheap analog dial hygrometers read whatever they read at the factory and drift unpredictably. Digital models with replaceable batteries and exposed sensors recover accuracy after the salt-test calibration. If your unit is sealed and uncalibratable, replace it before fruiting.
The Three Types of Hygrometers and Where Each Belongs
Three formats cover every grow-room need: standalone digital units inside the chamber, wired-probe digitals with the readout outside the chamber, and Bluetooth-connected loggers that record trends to a phone app. Each fits a different tub-vs-tent setup. The probe-on-wire format is the most universal.
Match the format to the chamber:
- Standalone digital inside a monotub: The simplest setup. Choose a model rated for 100% RH because condensation will kill non-rated electronics within 6-8 weeks.
- Wired probe with external readout: Best for shotgun fruiting chambers and Martha tents. The display sits outside the humid environment and the probe takes the punishment.
- Bluetooth logger (Govee, SwitchBot, Inkbird): Phone-app trend graphs catch slow drift you would never notice spot-checking. Useful if you batch ferment more than 2 tubs at once.
- Analog dial: Reliable in the negative sense — they reliably read wrong. Skip for fruiting; acceptable for casual cellar humidity tracking.
For most home growers running one or two tubs, a cheap digital unit with a salt-tested calibration offset note taped to the side beats an expensive lab unit you never bothered to check. For 3D-printed monotub lids and smart sensor automation, browse my equipment guides. Read the broader equipment trade-off in my still air box vs flow hood comparison.
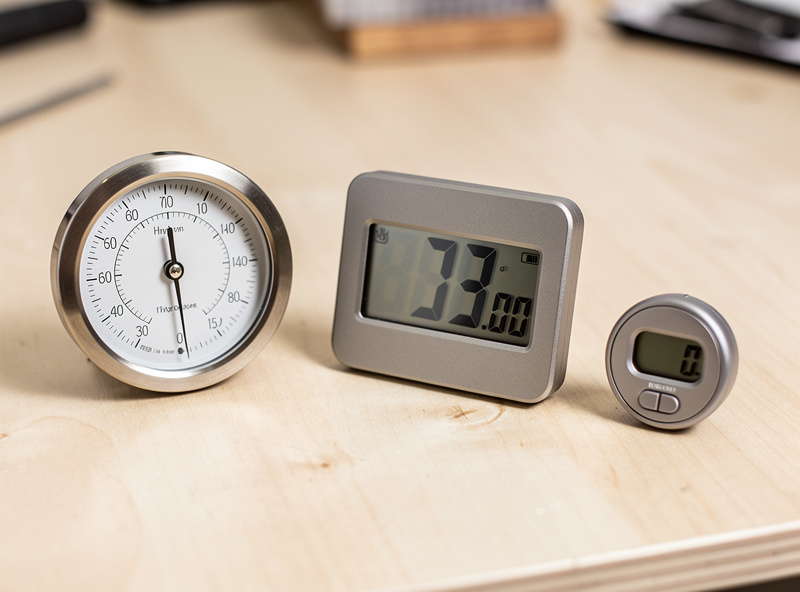
Best Hygrometer Picks for 2026
Three models cover most home grow setups, and prices below are roughly what they run at the time of writing — check the current listing since these shift: Govee H5075 Bluetooth (roughly $14, app logging, rated ±3% RH), ThermoPro TP50 (roughly $10, standalone digital, no probe), and Inkbird IBS-TH2 Plus (roughly $25-30, the “Plus” version is the one that actually supports the external waterproof probe — the base IBS-TH2 doesn’t). All three are solid stock, and all three still need the salt-slurry calibration check before you trust a fruiting-chamber reading.
Specific use-cases by model:
- Govee H5075 (roughly $14): Bluetooth, free phone app, ±3% RH rated accuracy, exports data for trend graphs. Runs on 2 AAA batteries for around 6-7 months, not years — don’t get that confused with the app’s multi-year data-export window. Best if you want graphs of overnight humidity drift to spot fan or door-seal issues.
- ThermoPro TP50 (roughly $10): Simplest reliable standalone digital — no external probe on this model, it’s an all-in-one unit you mount or magnet-stick near the chamber. If you specifically want a wired external probe with the display outside a sealed tub, that’s the Inkbird IBS-TH2 Plus below, not this one. Buy a pair if budget allows — one for the colonizing tub, one for fruiting.
- Inkbird IBS-TH2 Plus (roughly $25-30): The external-probe version in this price band, rated around ±3% RH. Pairs with Inkbird humidity controllers for closed-loop automation. The right call if your tubs use external humidifiers triggered by RH setpoints.
- SwitchBot Meter Plus (roughly $13-20 depending on retailer): Cleaner phone app than Govee, ±2% RH rated accuracy, about a year of battery life.
- AcuRite 00613 (roughly $20-30, not the bargain-bin price it sometimes gets listed at): A basic reliable digital, ±3-5% RH depending on the humidity range. Not the cheapest option in this list, but a known, established brand.
As an Amazon Associate I earn from qualifying purchases.
What to skip: any “indoor humidity monitor” sold via algorithmic e-commerce listings without a brand name, any unit without a battery cover (sealed batteries mean you cannot replace dead cells, ending the unit’s life early), and any analog dial labeled “humidity gauge” — they read whatever they read at the factory and drift unpredictably from there.
How to Calibrate a Hygrometer With the Salt Slurry Test
The salt slurry test confirms hygrometer accuracy at exactly 75% RH for $0 in materials. Mix 1/4 teaspoon of table salt with about 8 drops of water in a small dish, place dish and hygrometer together inside a sealed clear plastic container, wait 6-8 hours at room temperature. The hygrometer should read 75% RH ±2%.
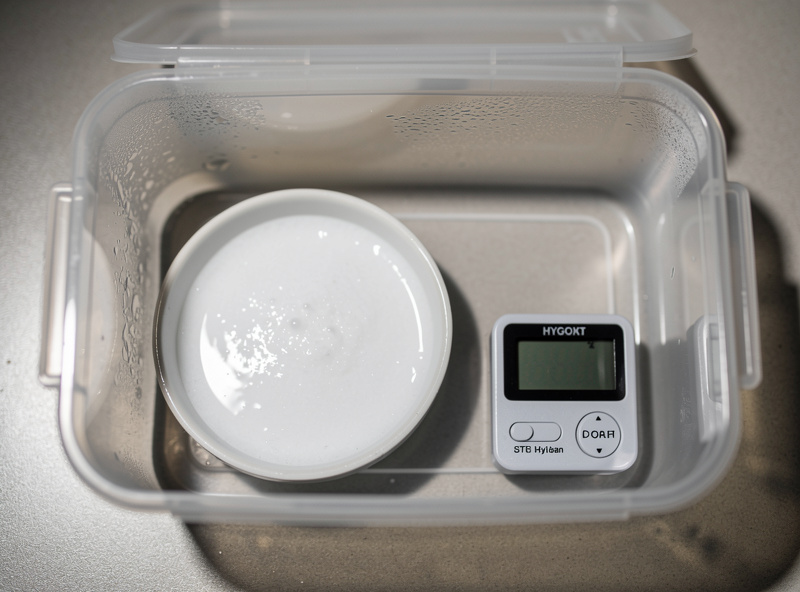
The full procedure:
- Mix the slurry. 1/4 tsp non-iodized salt + 5-8 drops of water until you have a thick wet paste. The salt should be wet but not floating.
- Set up the chamber. Use any clear sealable plastic container — a 1-quart deli container with a tight lid works perfectly.
- Place hygrometer inside. Lay it flat or prop it so the sensor is not touching the salt.
- Seal and wait 6-8 hours. Less than 6 and the air has not equilibrated. More than 12 makes no difference.
- Read without opening. Look through the clear plastic. Opening the container resets the test.
- Note the offset. If the unit reads 81%, your offset is +6%. Subtract 6 from every fruiting reading. Tape the offset on the back of the unit with a date.
Re-calibrate every 3 months in regular use, or any time a unit gets dropped, soaked, or runs flat on batteries. A unit that reads more than ±5% off true 75% should be retired — the sensor element has degraded past the point of useful correction.
Where to Place a Hygrometer Inside a Mushroom Chamber
Place the hygrometer at fruiting body height — about halfway up the chamber wall — not at the substrate surface and not at the lid. Substrate-level readings are 8-15% higher than what mushroom pins actually experience. Lid-level readings are 5-10% lower because of condensation drip patterns.
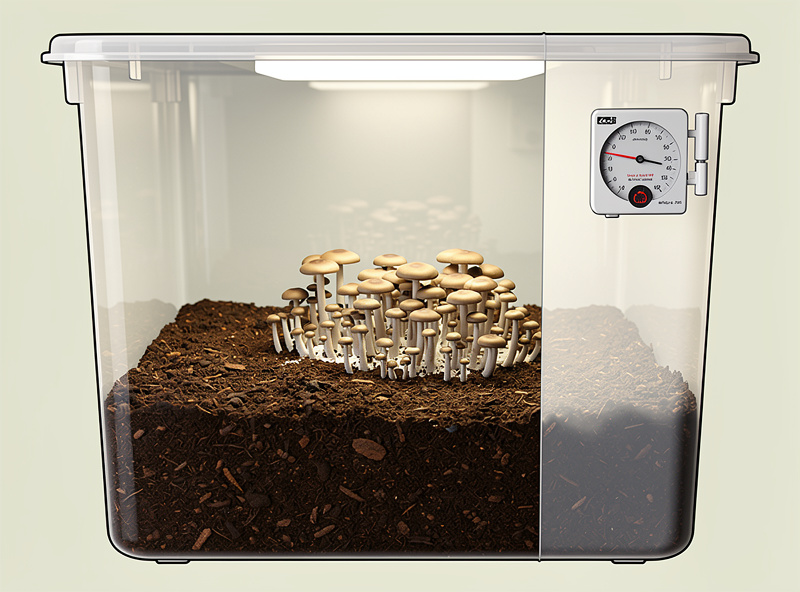
Placement rules that prevent false readings:
- Halfway up the chamber wall: Best single placement for a monotub or tent. Reads what the pins actually breathe.
- Avoid direct condensation drip: Water on the sensor reads 100% indefinitely until it dries.
- Keep 2 inches off the substrate: Surface microclimate is much wetter than the rest of the chamber.
- Shield from misting spray: Direct mist hits the sensor and gives a false 100% reading for 20-40 minutes after.
- Re-check placement after fruits form: A flush of large mushrooms can block airflow and shift the reliable reading zone.
For multi-tub setups, one hygrometer per tub is the minimum. Mushroom microclimates differ by enough margin that a single shared hygrometer in a tent will mislead you on at least one of three tubs. Beginner placement and chamber design errors are catalogued in our guide on mushroom growing mistakes every beginner makes.
Common Hygrometer Mistakes That Cost Grows
The four mistakes that ruin fruits despite “perfect” readings: trusting an uncalibrated unit, placing it on the substrate, forgetting to replace batteries before pinning, and using a single hygrometer for a chamber with multiple humidity zones. In my own grows, any one of these has been enough to abort a flush I was otherwise doing everything right on.
Avoid these and you eliminate most humidity-related fruiting failures:
- Trusting factory accuracy. Salt-test before first use. Even a $25 unit can ship with a 4-7% offset.
- Mounting at the lid. Reads condensation drip patterns instead of mushroom microclimate.
- Skipping the battery check at pinning. Low batteries cause readings to drift before the unit dies. Replace before fruiting, not after.
- One hygrometer per tent. Multi-tub fruit zones need one each.
- Ignoring overnight trend graphs. Bluetooth loggers catch the 3 AM dip that single-glance checks miss.
- Forgetting calibration after a flood. A wet sensor is a permanently miscalibrated sensor until tested fresh.
The cheapest reliable setup for a single-tub home grow is a basic standalone digital hygrometer like the ThermoPro TP50 (roughly $10), a sealed deli container you already own, and a quarter-teaspoon of salt. Under $15 total, salt-tested against the 75% reference point, ready for any species. This is the setup I actually run on my own smaller test tubs.
Frequently Asked Questions
What humidity does a mushroom fruiting chamber need?
Most gourmet species fruit best at 85-95% relative humidity for primordia formation, then 80-90% for full fruiting. Oyster mushrooms tolerate a wide 75-95% band, which is why they’re the forgiving beginner species. Lion’s mane wants the tighter, higher end of that range, 90-95%, with less room for error before pins abort.
How accurate are cheap hygrometers from grow kits?
Most $4-5 mini hygrometers ship with ±8-12% accuracy at humidity above 80%. They are usable for spawn run but unreliable for fruiting. Always salt-test before using one in a fruiting chamber and discard any unit reading more than ±5% off the salt test.
Do I need a Bluetooth or smart hygrometer?
Not for a single tub. Bluetooth becomes valuable when running multiple chambers because the trend graphs catch slow humidity drift before fruits abort. The Govee H5075 at $14 adds logging without changing your setup workflow.
How often should I calibrate my hygrometer?
Every 3 months in regular use, every time after batteries die, every time a unit gets soaked or dropped, and immediately when readings disagree with another unit by more than 4%. The salt test takes 6-8 hours and costs nothing.
Why does my hygrometer read 99% all the time?
Either the sensor has water on it from misting or condensation drip, or the chamber is genuinely saturated and dripping. Move the sensor to a dry corner of the chamber and check whether readings drop within an hour. Sensors that read 99% in dry air permanently are damaged and need replacement.
Can I use one hygrometer for multiple grow tubs?
Only if the tubs share a single sealed environment like a Martha tent. Separate tubs always develop different humidity microclimates from substrate moisture differences and lid seal variation. Use one hygrometer per tub for accurate readings.