
The complete kit for a home mushroom lab capable of agar work, liquid culture, grain spawn, and bulk substrate fruiting cost me roughly 350 dollars when I built mine out in 2024 — at today’s prices, with the pressure canner and electronics both up, budget closer to 400 to 480 dollars. Everything beyond that is convenience or scale, not capability. After three years and roughly 90 inoculations I have settled on a working set of 14 specific tools that I would buy again in the same order if I started over tomorrow. This guide is that list, ranked by leverage per dollar.
Equipment falls naturally into four categories — sterile work, climate sensing, climate control, and containers — plus two cross-cutting tools that have outsized impact: a 3D printer for custom mycology parts and a smart-sensor hub for automated alerts. The order matters: I tried to skip sterile work in year one and paid for it in green-mold contamination; I tried to skip climate sensing in year two and paid for it in dry pins. By year three the rig was boringly reliable.
The Three-Tier Equipment Map (Beginner, Intermediate, Advanced)
Each tier corresponds to a capability level, not a budget. Beginner gets you reliable oyster monotubs and basic gourmet species. Intermediate adds agar work, liquid culture, and supplemented sawdust blocks for lion’s mane and reishi. Advanced adds cordyceps jars, automation, and the capacity to run 10 or more concurrent blocks. Most home growers stop at intermediate and never regret it.
| Tier | Capability | Total Spend | Key Items | Time to Build | Yield Ceiling |
|---|---|---|---|---|---|
| Beginner | Monotub oysters + ready-made grain spawn | $60-100 | Tote monotub, hygrometer, spray bottle, gloves | 1 weekend | 2-3 kg/month |
| Intermediate | + Agar, LC, grain spawn, supplemented blocks | $220-350 | + Pressure cooker, SAB, scale, thermometer-control, fruiting tent | 2-3 weekends | 4-6 kg/month |
| Advanced | + Cordyceps, full automation, 10+ concurrent blocks | $500-900 | + Flow hood, smart sensors, 3D printer, humidistat, Home Assistant | 4-6 weekends | 10-15 kg/month |
| Commercial-adjacent | + Cold incubation, 24/7 climate, multi-room | $2,000+ | + Walk-in fruiting room, dedicated power, redundant climate | Months | 20+ kg/month |
My personal rig sits at the upper end of intermediate plus selective advanced add-ons (Home Assistant integration, 3D-printed monotub lids, smart humidistat). I never built a flow hood — in my own contamination log, an SAB with disciplined technique gets you most of the way to flow-hood contamination rates for a fraction of the cost, as I cover in the dedicated SAB vs flow hood comparison.
Sterile Work: SAB, Pressure Cooker, and Tool Sterilisation
The single highest-leverage equipment category is sterile work. Get this right and your contamination rate drops below 10 percent. Get it wrong and no other equipment investment matters. My three core items: a still-air box (made from a 60-litre clear tote, 18 dollars in parts), a 23-litre pressure cooker rated for 15 PSI (89 dollars), and a glass test-tube of 99% isopropyl alcohol on a beanbag stand for tool dipping (4 dollars).
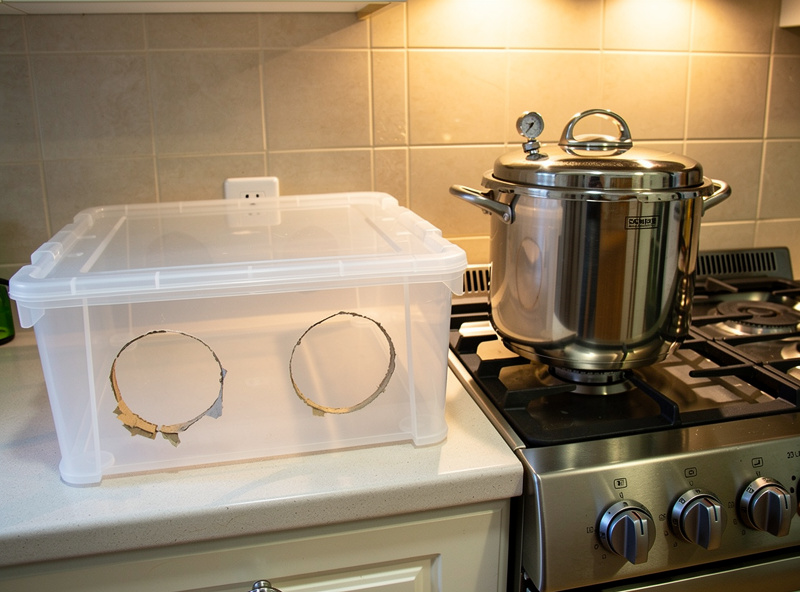
The pressure cooker is the most consequential purchase, and it’s also the item where I need to correct my own numbers. Anything under 15 PSI rated is not a real pressure cooker for mycology purposes — you cannot sterilise grain or supplemented substrate at 10-12 PSI; the temperature does not reach the level required to kill heat-tolerant bacterial spores. Look for “All American 921” or “Presto 23-Quart” as the two most-recommended models in home-lab forums; mine is the Presto and after 90 inoculation cycles it still seals reliably. I paid roughly 90 dollars for mine in 2024 on a sale; checking Presto’s own current listing, the same 23-quart model runs 185 dollars now — budget for the current price, not what I happened to pay.
The decision to skip a flow hood is one I am asked about constantly. The honest answer is in still air box vs flow hood: under 10 sterile transfers per month, an SAB and disciplined hand-and-tool hygiene give you the same contamination rate as a low-end flow hood. The break-even is well above what a home grower needs. If you push past 10 transfers per month or work with very contamination-sensitive species, then a 4-inch HEPA flow hood (300-500 dollars to build) becomes worthwhile.
Climate Sensing: Hygrometer, Thermometer, Multi-Sensor
You cannot control what you do not measure. The minimum climate-sensing kit is one accurate hygrometer-thermometer combo per fruiting tent plus one for the work room. The trap is that most consumer-grade hygrometers drift wildly under chronic 90 percent humidity — exactly the environment you put them in. After breaking three units in year one, I now use Govee H5075 or H5101 Bluetooth sensors paired with the SwitchBot Hub for logging.
Placement matters as much as accuracy. A hygrometer mounted at the top of a fruiting tent reads dramatically different from one at the bottom, and both read different from one in the middle. The single most useful adjustment I ever made was moving the sensor from the lid to the mid-shelf level — the readings dropped from “90%” to a more accurate 85%, which revealed that I had been chronically under-humidifying and explaining away small pins as a strain issue. The full placement, accuracy, and brand comparison is in best hygrometer for mushroom growing.
For the work room — separate from the fruiting tent — a single Govee unit hangs above my pressure cooker. The metric I track most: room temperature during pressure-cooker cool-down. If room temp exceeds 24 C while sterile substrate is cooling, I delay inoculation to the cooler overnight window. Substrate cooling under warm air is one of the silent contamination vectors no beginner guide mentions.
Climate Control: Humidifier, Heater, Fresh-Air Exchange Fan
Climate control is the most species-dependent equipment category. Lion’s mane wants 18-22 C and 90-95% RH; reishi wants 24-27 C and 90-95%; cordyceps wants 18-22 C in a closed jar (no FAE). The challenge is hitting these setpoints reliably in a home where the ambient temperature can swing 8-12 C between day and night.
As an Amazon Associate I earn from qualifying purchases.
My control loop: an Inkbird ITC-308 thermostat (29 dollars) drives a small 60-watt ceramic heater (16 dollars) for cool nights and a 25-watt USB ultrasonic humidifier (22 dollars) for humidity. The ultrasonic feeds a small reservoir; the reservoir gets refilled every 3 days; the humidistat (TP-Link KP115 smart plug paired with Home Assistant, 12 dollars + free) cuts power at 95% RH and resumes at 88%. For FAE I run a 120-millimetre USB PC fan (8 dollars) on a separate timer doing 5-minute pulses every 30 minutes.
The most common climate-control failure in home setups is humidifier reservoir running dry overnight. The fix is a simple 10-dollar float switch wired to the smart plug; when water level drops below safe, the smart plug cuts the humidifier and sends a Home Assistant alert. The integration recipe is the same automation pattern I document in smart sensors for mushroom fruiting chambers and is conceptually identical to the climate work the team next door uses for curing chamber climate control — different setpoints, identical sensor stack.
Containers: Filter Bags, Mason Jars, Monotubs
Container choice determines your workflow more than any other equipment decision. Filter-patch grow bags (1.5-3 kg capacity) are for supplemented sawdust blocks of gourmet species. Wide-mouth Mason jars (500 ml and 1-litre) are for grain spawn and cordyceps cultivation. Clear plastic totes (35-60 litres) are for monotubs of oyster and shaggy mane species.
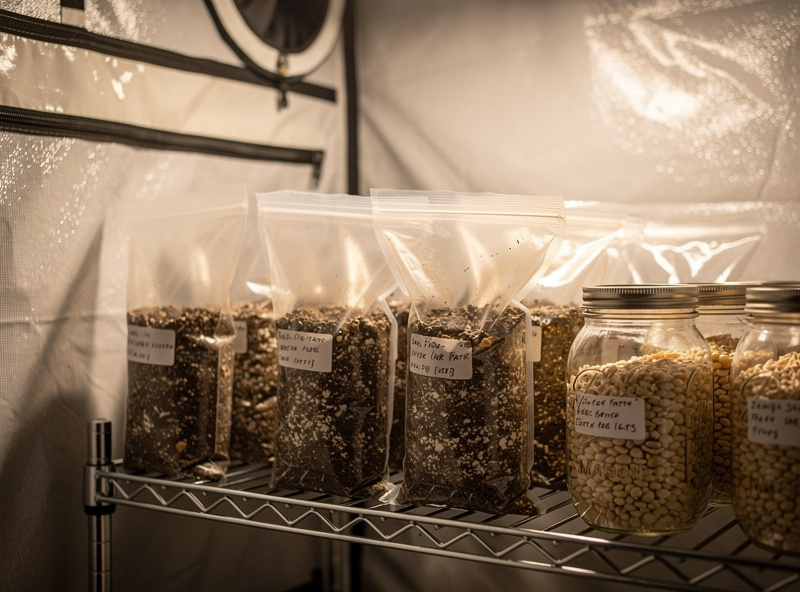
Specifics that took experimentation to settle: filter-patch bags need 0.2-micron patches, not 0.5-micron — the smaller patch keeps contaminants out but still allows gas exchange. Mason jars work better than canning jars because the wide mouth admits an inoculation loop and the 1-litre size is the sweet spot between batch yield and pressure-cooker capacity. For monotubs, clear totes from a hardware store (Sterilite, Iris, or the local equivalent) work as well as mycology-branded totes at one third the price.
The monotub lid is the weak point of every consumer tote. Either the lid does not seal tight enough (causing humidity loss and aborts) or you cannot get enough fresh-air exchange. Both problems disappeared when I switched to 3D-printed mushroom monotub lids with filter patches. The print files I use add four 0.2-micron patches to a standard 35-litre tote lid and a tight rubber seal around the edge — total cost in filament: about 2 dollars per lid.
3D Printing for Custom Mycology Tools
A 3D printer was the single best ROI tool I added in year two. The printer (a 200-dollar Bambu A1 Mini, or any equivalent low-end FDM printer) earns its price back inside ten parts. The parts that justified it: monotub lids with integrated filter patches, jar-lid inoculation port plugs, grain-bag stand frames, humidifier nozzle adapters, scalpel holders, alcohol-dish bases, and a custom syringe rack for liquid culture.
Most of these parts cost under 50 cents each in PETG or PLA filament and replace 8-15 dollar mycology-branded equivalents. The filament choice matters: PETG is preferred for anything in contact with moisture or substrate, PLA for tooling that lives outside the chamber. ABS works but smells during printing — I avoid it in the kitchen. The full part library I use is documented in 3D-printed monotub lids and filter patches; treat that article as the entry point into the broader 3D-printed mycology workflow.
One non-obvious 3D-printing use: post-mortems. When a contamination event happens, I now print a labelled jig that holds the failed jar in a known orientation for photo documentation. Photographing failures in a repeatable setup means I can compare across months and species — and the visual reference set in what does mycelium look like is partly built from those documented failures.
Smart Sensors and Home Automation
The leap from manual climate control to smart automation cost me 60 dollars in sensors and a weekend of integration work. The Home Assistant stack I use: Govee H5075 Bluetooth sensors in each fruiting chamber, TP-Link KP115 smart plugs on humidifier and heater, an Aqara water-leak sensor under the reservoir, and a Raspberry Pi 4 running Home Assistant OS. Total cost including the Pi: about 130 dollars in 2024.
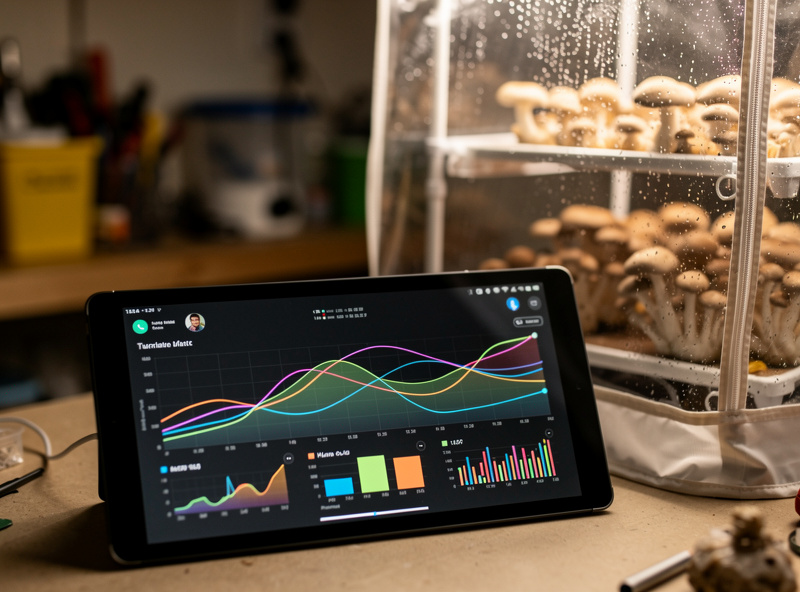
The automations I run: humidity drops below 85% for 15 minutes during fruiting → smart plug switches humidifier on; humidity climbs above 95% → 5-minute FAE fan pulse; temperature drifts outside 18-22 C window during lion’s mane fruiting → push notification to phone; water-leak sensor wet → audible alert and humidifier shutoff. Each of these took me 20 minutes to set up after the initial Home Assistant install.
The deeper integration patterns are covered in smart sensors for mushroom fruiting chambers. If you already use Home Assistant for any other purpose — solar monitoring, garden irrigation, indoor air quality — the mushroom chamber drops into the same stack with zero additional infrastructure. The same network design and VLAN considerations homelabrouter recommends for IoT devices apply directly to mycology sensor placement.
My Bill of Materials After Three Years
The exact list I would buy again, in priority order, with what I paid over three years of gradually-timed purchases (2024-2026, not all in one order): 23-litre 15-PSI pressure cooker (roughly 90-190 dollars depending on when you buy — see the correction above), 60-litre clear tote and gloves for SAB build (18 dollars), 1.2 m fruiting tent (65 dollars), Inkbird ITC-308 thermostat (29 dollars), USB ultrasonic humidifier (22 dollars), Govee H5075 thermohygrometer x 2 (roughly 40-50 dollars), 60-watt ceramic heater (16 dollars), 120 mm USB FAE fan (8 dollars), assorted gloves, scalpels, alcohol (15 dollars), 12-pack filter-patch bags (18 dollars), wide-mouth 1-litre Mason jars x 12 (24 dollars), TP-Link KP115 smart plugs x 3 (roughly 30-45 dollars).
Total before automation: roughly 385 to 485 dollars at today’s prices, not the flat 350-ish figure I quote from memory — the pressure cooker alone accounts for most of that spread. Add a 3D printer and a Raspberry Pi and the picture gets less predictable, not more: the Bambu A1 Mini I bought for 200 dollars in 2024 now lists closer to 260-300 dollars, and the Raspberry Pi 4 I paid roughly 75 dollars for (board plus SD card) has climbed toward 90-100 dollars because of the memory-chip shortage that has been pushing Pi 4 and Pi 5 prices up through 2025 and 2026 (Raspberry Pi’s own pricing announcements confirm the trend, it isn’t just my supplier). Call the fully-automated rig 650 to 850 dollars at current prices rather than a fixed number — at which point you have a fully automated mycology lab capable of running every species I have profiled in the medicinal mushrooms guide, including cordyceps jars and supplemented lion’s mane blocks.
If you want the bare-minimum starter list to grow oysters reliably, drop everything except the pressure cooker (still optional if you start with pre-pasteurised straw), one Govee sensor, one tote monotub, and the humidifier and FAE fan. That is a 110-dollar kit that produces 2-3 kilograms per month of fresh oysters — enough to justify itself within three flushes. Climb the tier ladder only when the current tier no longer constrains what you want to grow. Detailed beginner-tier mistakes I have made on the climb are in mushroom growing mistakes.
What Actually Wears Out (And What Doesn’t)
Nobody talks about equipment lifespan in mycology gear guides, and after three years of running the same core kit I have a decent sense of what needs replacing on a schedule versus what just keeps working. The pressure cooker gasket is the one genuine consumable in the sterile-work category — mine needed its first gasket swap around the 60-cycle mark, a five-dollar part, and I now keep a spare on hand rather than finding out mid-batch that it has gone brittle. The gauge itself has stayed accurate against a second reference gauge I bought specifically to cross-check it once a year.
The ultrasonic humidifier disc is the other real wear item. The piezo element that atomises water slowly loses output over months of daily use in hard water, and I get roughly 8 to 10 months of reliable mist before a unit needs replacing outright rather than descaled. Switching to distilled or reverse-osmosis water for the reservoir noticeably extended that window versus tap water, which was leaving a visible mineral crust on the disc within weeks.
What has surprised me by not wearing out: the still-air box itself (still the original tote, no cracks, no warping), the Inkbird thermostat (three years of continuous relay cycling with zero failures), and the Govee sensors, which lose calibration slowly enough that I only noticed by cross-checking against a fresh unit rather than any obvious failure. The FAE fan bearings are the one item I expected to fail and haven’t — running on 5-minute pulses rather than continuously seems to be the reason; a fan running continuously in a humid tent is a different reliability story than one cycling on a timer.
The Three Tools That Surprised Me Most
Three pieces of equipment delivered far higher value than their cost suggested, and one delivered far less. The over-performers, in order of surprise: the 15-dollar food scale, the 8-dollar USB fan, and the 4-dollar test tube of isopropyl alcohol. The under-performer: a 65-dollar UV-C sterilising lamp I bought in year one that I now think contributed roughly zero to my contamination rate.
The food scale matters because every substrate decision is a weight ratio — 80 percent sawdust, 15 percent bran, 5 percent gypsum, 60-65 percent moisture. Eyeballing it produces inconsistent blocks; weighing produces repeatable yields. I weigh dry components, weigh after hydration, and write both numbers on the bag. After 30 blocks the data revealed that my “consistent” eyeballed mix was actually 75-85 percent sawdust and 12-18 percent bran — wide enough variation to explain block-to-block yield swings I had attributed to spawn variability. The accurate weighing discipline transfers from fermentation work where salt percentage decides everything; mycology is no different.
The USB FAE fan beats every battery-powered or wall-powered fan I tried because it runs on the same USB power bank that backs up the humidifier during the rare power blip. The test tube of alcohol is a hard-to-overstate quality-of-life upgrade — flame-sterilising tools between every transfer becomes effortless when the alcohol bath is right next to your work surface in a stable holder. The UV-C lamp, by contrast, did not measurably reduce contamination in side-by-side trials and I now think the contamination pressure points (substrate, hands, tools) are not what UV-C addresses well.
Frequently Asked Questions
What is the minimum equipment to start growing mushrooms at home?
A 35 to 60 litre clear plastic tote (monotub), one accurate hygrometer-thermometer, a small ultrasonic humidifier, nitrile gloves, and 70 percent isopropyl alcohol — total cost under 100 dollars. This kit produces 2 to 3 kilograms per month of oyster mushrooms using pre-made grain spawn from a mycology supplier. Add a pressure cooker only when you want to make your own grain spawn or work with gourmet species.
Do I need a pressure cooker for home mushroom cultivation?
Only if you want to sterilise your own grain spawn or supplemented sawdust blocks. You can grow oysters on pasteurised straw without one, and you can buy pre-made sterile grain spawn for any other species. A 15 PSI pressure cooker becomes worthwhile once you are running enough inoculation cycles a month that the per-batch savings versus buying pre-made spawn start adding up — I would not put an exact payback window on it, since canner prices have moved a lot since I bought mine.
Are Govee or SwitchBot hygrometers accurate enough for mushroom cultivation?
Yes, both Govee H5075 and SwitchBot Bluetooth hygrometers maintain plus or minus 3 percent RH accuracy in chronic 90 percent humidity for at least 12 months of continuous use. They outperform most analog hygrometers and are vastly more reliable than the cheap dial units sold with starter kits. Replace either model after 18 to 24 months of fruiting-tent service.
What 3D printer should I buy for mycology parts?
Any low-end FDM printer with a heated bed and PETG capability works. I paid 200 dollars for my Bambu A1 Mini in 2024; it now lists closer to 260-300 dollars, but it’s still the value leader in its class and prints monotub lids, jar plugs, and humidifier adapters reliably without tuning. Avoid resin printers — they are unnecessary for mycology parts and the resin is harder to clean from food-contact surfaces.
Is Home Assistant worth setting up just for mushroom growing?
If you already run Home Assistant for anything else, yes — adding mycology sensors takes one weekend. If you are starting from zero just for mushrooms, manual climate control with an Inkbird thermostat and a humidistat smart plug is 80 percent as effective at one tenth the setup time. Add Home Assistant in year two when you already know which alerts you actually want.
How much electricity does a home mushroom setup use?
A single fruiting tent with one humidifier (25 W), one FAE fan (3 W), one heater used intermittently (60 W average 15 percent of the time), and one LED strip (12 W) draws around 1.0 to 1.5 kWh per day in active use — about 4 to 6 dollars per month at average European or US residential rates. The pressure cooker is the biggest single load (1500 W) but runs only 2 to 3 hours per week.