
A monotub is the fastest way to jump from a few fruiting blocks to real harvests: spawn colonized grain into a tub of pasteurized bulk substrate, give it the right gas exchange, and a single 54-quart tub can throw multiple pounds of oyster or wine cap across two or three flushes. The whole method lives or dies on one number — spawn-to-bulk ratio — and on keeping the bulk clean enough to outrun mold.
I run bulk growing for the gourmet and edible species that actually reward it — oyster on the weekly rotation, wine cap when the garden bed needs topping up, the occasional Agaricus tub when I want button mushrooms off compost. Bulk is not the right tool for every species (lion’s mane and king oyster I still fruit off Masters Mix blocks), but for the forgiving wood- and straw-lovers it is the highest-yield, lowest-fuss way to grow at home. This guide is the whole chain: build the tub, prep the bulk, spawn it, run the gas and humidity, pin it, and harvest flush after flush.
What Is a Monotub and When to Use One
A monotub is a clear plastic storage tub fitted with holes for fresh-air exchange, used to fruit a bulk substrate that has been spawned with colonized grain. It is the bridge between small jar-and-block growing and shelf-scale production — a 54-quart tub holds roughly 10–14 quarts of bulk substrate and fruits in the same humid, gas-controlled environment that a Martha tent provides, but for a fraction of the cost.
The reason to reach for a tub instead of a fruiting block is throughput. A block gives you what its bag holds; a tub lets you spawn a large mass of substrate at a known ratio so the colonized grain runs the bulk fast enough to beat contamination. For an oyster or wine cap grower who wants pounds rather than ounces, the tub is the workhorse. The trade is space and the need to dial in fresh-air exchange — a sealed tub will stall, overlay, and never pin.
Which Species Belong in a Bulk Tub
Bulk growing suits the aggressive, forgiving wood- and straw-decomposers: pearl, blue, pink, and golden oyster on pasteurized straw or coir-based CVG, wine cap (Stropharia) on a wood-chip/straw mix, and button or portobello (Agaricus bisporus) on composted manure with a casing layer. These species colonize bulk fast and tolerate the slightly-less-than-sterile reality of a pasteurized substrate.
Not every gourmet mushroom wants a tub. Lion’s mane, king oyster, shiitake, reishi, and the other dense wood-lovers fruit better off sterilized supplemented sawdust blocks or Masters Mix, where the slower colonization is protected by full sterilization rather than pasteurization. If you are choosing between methods, my grow kit vs DIY monotub breakdown covers when a tub is the right first build at all, and the substrates guide maps each species to its substrate.
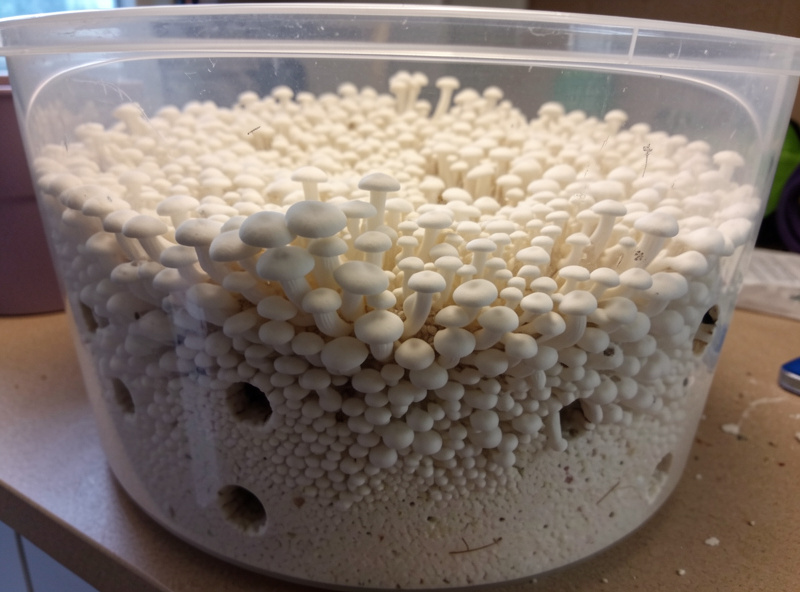
Building the Tub: Holes, Depth, and Liner
The classic build is a 54-quart clear or semi-clear tub with two rows of holes for fresh-air exchange. I drill 2-inch holes — four on each long side, two on each short side — centered roughly at the substrate’s top surface so the gas exchange happens at the fruiting zone, not down in the substrate. Some growers run “shotgun” tubs with dozens of small holes; I prefer fewer large holes I can tape down to tune airflow.
Substrate depth matters more than people expect. Keep bulk between 4 and 6 inches deep. Shallower than 4 inches dries out and yields poorly; deeper than 6 inches and the lower substrate stays cold and CO2-logged, colonizing slowly and inviting anaerobic bacteria. A black trash-bag liner up the sides (leaving the top open) helps direct pinning to the surface instead of the side walls, which keeps the flush clean and easy to harvest.
The lid is part of the build, not an afterthought. During colonization I want the lid on tight to hold CO2; during fruiting I prop it slightly or rely on the side holes for exchange, depending on how thirsty the species is for fresh air. Micropore tape over the holes during colonization lets a little gas through while keeping spores out, then peels off cleanly when it is time to fruit. Whichever tub I use, I wipe the inside down with 70% isopropyl before spawning and let it flash off — a clean starting surface is free insurance against a contaminant riding in on dust.
Preparing the Bulk Substrate
Bulk substrate for a tub is pasteurized, not sterilized — the point is to knock back competitors while leaving enough beneficial microbes that the colonizing grain still wins the race. For oyster and most tubs I run CVG (coir, vermiculite, gypsum) or pasteurized straw at field capacity. Field capacity means the substrate is fully hydrated but releases only a drop or two when squeezed hard; too wet and you get bacterial blotch and pooling, too dry and the mycelium stalls.
Pasteurization holds the substrate at roughly 65–75°C (149–167°F) for 60–90 minutes — hot enough to kill mold spores and weed fungi, cool enough to preserve a competitive microbial floor. Going hotter, into true sterilization range, actually backfires on bulk because it leaves a sterile substrate with no microbial defense if a single contaminant lands. The full method, including the cooler “tek” and hot-water bath, is in the straw pasteurization guide and the cold vs hot pasteurization comparison. The squeeze test for moisture is covered in the field-capacity guide.
The Spawn-to-Bulk Ratio That Beats Contamination
Spawn-to-bulk ratio is the single most important number in tub growing: it sets how fast the colonized grain overtakes the bulk before mold can establish. The home-grower sweet spot is 1:2 to 1:3 by volume — one part colonized grain spawn to two or three parts bulk substrate. At 1:2 a tub can fully colonize in 7–10 days; stretch to 1:4 or beyond and you save spawn but hand contaminants a week-long head start.
I run 1:2 whenever I am working with grain I am not 100% sure is clean, and 1:3 when the spawn is glass-clear rhizomorphic and the room is dialed in. The mechanics, including how to mix without compacting the substrate and how to layer a top dressing, are in the dedicated spawn-to-bulk ratio guide. Whatever ratio you choose, break up the grain and mix it through the bulk evenly — clumped spawn colonizes in islands and leaves uncolonized pockets for mold.
| Stage | Target Condition | Typical Duration | What Goes Wrong |
|---|---|---|---|
| Colonization | 21–24°C, high CO2, no FAE, dark | 7–14 days | Stall if too cold; mold if grain weak |
| Consolidation | White overlay forms, surface knits | 2–4 days | Heavy overlay if FAE starts too late |
| Pinning | Drop CO2, add FAE + light, 18–21°C | 3–7 days | No pins if CO2 stays high |
| Fruiting | 85–95% RH, steady FAE, indirect light | 5–10 days | Aborts if humidity swings |
| Flush + reset | Harvest, rest, rehydrate if needed | 7–14 days between flushes | Contam window opens after flush 1 |
Colonization: The Quiet Phase
Once spawned, the tub wants warmth, darkness, and high CO2 — the opposite of fruiting. I keep colonizing tubs at 21–24°C (70–75°F) with the FAE holes taped over so CO2 builds and drives the mycelium to run fast and ropey through the bulk. No light is needed yet; light at this stage just encourages premature side-pinning. Resist the urge to open and check — every lid-lift is a contamination opportunity and dries the surface.
Full colonization shows as the entire top surface and visible sides knitting white. When the surface has gone solidly white and started to “overlay” into a fuzzy mat, the tub is consolidated and ready to switch into fruiting conditions. This is the moment to begin fresh-air exchange — leave it too long and the overlay thickens into a tough hydrophobic mat that resists pinning.
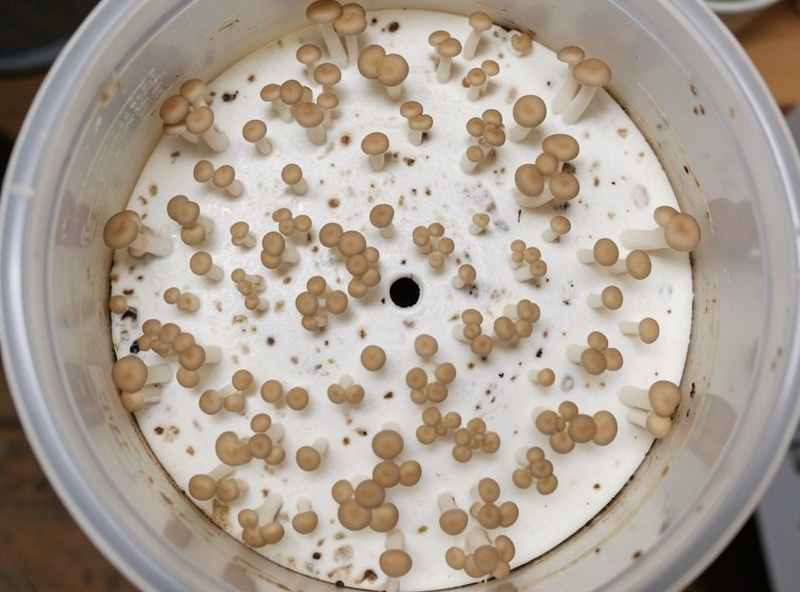
Triggering Pins: FAE, Light, and the Drop in CO2
Pinning is triggered by a deliberate environmental shift: drop the CO2 with fresh-air exchange, introduce indirect light on a roughly 12-hour cycle, and let the temperature ease down a few degrees. The mycelium reads falling CO2 and rising light as “I have reached the surface of the log” and begins forming primordia — the tiny pins that become mushrooms. Without that gas-exchange shift, a fully colonized tub will sit and overlay indefinitely.
How much FAE depends on species and tub design. Oyster is hungry for fresh air and tolerates aggressive fanning; wine cap and Agaricus want gentler exchange. I tune by partially untaping holes and watching the pin morphology — long leggy stems with tiny caps mean too much CO2, so I open more holes. The full balance of gas exchange against humidity is in the FAE and CO2 guide, and the specific triggers per species are in the pinning conditions guide.
Fruiting and Harvesting Flushes
Once pins set, the tub needs steady 85–95% humidity, consistent fresh air, and indirect light until the caps mature. Harvest just before or as the caps begin to flatten and the edges start to upturn — for oyster that is when the cluster is full but the margins have not yet curled and dropped spores. Pull the whole cluster by twisting at the base rather than cutting, which leaves less stump to rot and harbor bacteria.
A healthy tub gives two to three flushes. After the first harvest, the substrate rests for 7–14 days, sometimes with a light rehydrating dunk, before pinning again — each successive flush is usually smaller. The complete harvest-timing and reset routine is in the flushes and harvest guide. Knowing when to retire a tub matters too: once yields drop off and green mold starts appearing in the spent bulk, the tub has given what it will, and that spent substrate has a second life in the garden.
Between flushes, the surface left behind after harvest is where trouble starts. I clear away any leftover stems and aborted pins immediately, because rotting tissue is exactly what bacteria and cobweb mold colonize first. If the bulk has dried at the surface, a brief dunk or a misting brings it back toward field capacity, but resist soaking it — a waterlogged tub between flushes sours faster than it pins. The second flush rewards patience: give the mycelium time to re-knit and re-accumulate energy before forcing pins, and the cluster comes back fuller than if you rush it. By the third flush most tubs are visibly tired, and that is the natural point to harvest the last of it and reset the rotation with a fresh tub.
Keeping Bulk Tubs Clean
Bulk’s weakness is that pasteurized substrate has a thinner microbial defense than a sterilized block, so a heavy spawn rate and clean grain are your real protection. The contamination that kills tubs is almost always introduced at spawning — weak or already-contaminated grain, dirty hands, or an unclean mixing surface — not during fruiting. Green Trichoderma, cobweb mold, and bacterial wet spot are the usual suspects, and triaging them early is the difference between losing a flush and losing the tub.
The same clean-process discipline that protects a salami curing chamber or a sourdough starter protects a tub: work clean, spawn heavy, and do not open the lid more than you must. Bulk-specific contamination forensics — what to toss, what to harvest around, and how to stop it spreading — are covered in the bulk contamination guide, and the upstream bulk prep that prevents most of it is in the bulk substrate prep guide. For the broader contamination picture across all methods, see the substrate guide.
Monotub vs Other Bulk Methods
The monotub is the default bulk method for home growers because it is cheap, self-contained, and forgiving, but it is not the only way to fruit bulk substrate. A shotgun fruiting chamber (SGFC) is a tub riddled with small holes sitting on a perlite bed, fruiting smaller cakes or trays inside a passively humid box; it gives finer control for tiny batches but does not scale. A Martha-style fruiting tent fruits multiple bags or trays at shelf scale with an ultrasonic humidifier on a humidistat, which is where I move once a single tub is no longer enough. The tub sits between those: more volume than a shotgun chamber, far less infrastructure than a Martha.
The honest tradeoff is control versus simplicity. A monotub passively manages humidity from the moisture in the substrate itself, which is why it works without any humidifier — but that also means you cannot fine-tune humidity the way a humidistat-controlled tent can. For oyster and wine cap the passive approach is plenty; for fussier fruiting you eventually graduate to active humidity control. If your tub keeps drying out or pooling, the problem is almost always substrate moisture or hole placement, not a missing humidifier.
| Method | Best Batch Size | Humidity Control | Cost | Best For |
|---|---|---|---|---|
| Monotub | 10–14 qt bulk | Passive (from substrate) | Low | Oyster, wine cap, Agaricus |
| Shotgun chamber | Small cakes/trays | Passive (perlite) | Very low | Tiny test batches |
| Martha tent | Multiple bags/trays | Active (humidistat) | Medium | Shelf-scale, many species |
| Fruiting blocks (open bag) | One block | Tent or ambient | Low | Lion’s mane, king oyster |
The Mistakes That Kill Most First Tubs
Almost every failed first tub comes down to one of four errors, and none of them happen during fruiting. The first is a spawn rate that is too low: a 1:5 or weaker ratio leaves so much uncolonized substrate that mold establishes before the mycelium can knit it together. Spawn heavy — 1:2 is never wrong for a beginner. The second is substrate that is too wet. New growers consistently over-hydrate bulk, and a tub with water pooling in the bottom corner will sour with bacteria and never recover; hit field capacity and no wetter.
The third is starting fresh-air exchange too early or too late. Untaping the holes during colonization invites contamination and dries the surface before the mycelium has consolidated; leaving them taped after full colonization produces a thick overlay that will not pin. Watch the surface, not the calendar. The fourth is opening the lid constantly to admire progress — each lift exchanges air, drops humidity, and risks dropping a contaminant onto open substrate. Set the tub up right, then leave it alone and observe through the clear walls.
One more that catches people: cold colonization. A tub parked in a 16°C basement colonizes so slowly that contaminants get their head start regardless of spawn rate. Keep colonizing tubs warm at 21–24°C and they outrun trouble. If you only fix two things from this whole guide, spawn heavier and keep the bulk at the right moisture — those two solve the overwhelming majority of failures.
Scaling From One Tub to a Routine
Once a single tub fruits reliably, scaling is mostly a question of staggering. I keep tubs at different stages running at once — one colonizing, one fruiting, one resetting between flushes — so the harvest is continuous rather than feast-or-famine. The limiting input is almost always clean grain spawn: if you can reliably produce or buy colonized grain, you can run as many tubs as your space and your fresh-air discipline allow. Producing your own spawn from liquid culture or grain-to-grain transfers is the step that makes a bulk routine economical.
Expected yields settle in once you have a few tubs behind you. Biological efficiency — the weight of fresh mushrooms relative to the dry substrate weight — runs highest on the first flush and tapers after. A realistic read on yields by species, and how biological efficiency is calculated, is in the yield per block guide. Bulk does not change the fundamentals of cultivation; it just multiplies them, which means it also multiplies a clean-process slip into a bigger loss. Get the small things right at one-tub scale before you run five.
Related Guides in This Cluster
- Spawn-to-Bulk Ratio: Getting the Mix Right
- Bulk Substrate Prep for Monotubs
- Casing Layers: When and How to Use One
- FAE and CO2 Control for Bulk Fruiting
- Pinning Conditions: Triggering Your First Pins
- Harvesting Flushes and Resetting the Tub
- Bulk Contamination: Diagnosis and Triage
Frequently Asked Questions
How much can a monotub yield?
A well-run 54-quart tub of oyster typically yields 2 to 4 pounds of fresh mushrooms across two or three flushes, with the first flush being the largest. Yield depends on spawn rate, substrate quality, and fresh-air exchange.
What is the best spawn-to-bulk ratio for beginners?
Use 1:2 by volume, one part colonized grain spawn to two parts bulk substrate. This higher spawn rate colonizes fast, in 7 to 10 days, and gives contamination the least chance to establish in a pasteurized bulk.
Why is my monotub not pinning?
The most common cause is too little fresh-air exchange. A fully colonized tub stays in colonization mode until CO2 drops. Add FAE by opening holes, introduce indirect light on a 12-hour cycle, and ease the temperature down a few degrees.
Do I need to sterilize bulk substrate for a monotub?
No. Bulk substrate is pasteurized at 65 to 75 degrees Celsius for 60 to 90 minutes, not sterilized. Pasteurization preserves beneficial microbes that help the colonizing spawn outcompete mold, which a fully sterile bulk would lack.
How deep should the substrate be in a monotub?
Keep bulk substrate between 4 and 6 inches deep. Shallower dries out and yields poorly; deeper leaves the lower layer cold and CO2-logged, colonizing slowly and inviting anaerobic bacteria.
Which mushrooms grow best in a monotub?
Forgiving wood and straw decomposers do best: oyster varieties, wine cap, and button or portobello with a casing layer. Dense wood-lovers like lion’s mane and king oyster fruit better on sterilized blocks instead.