
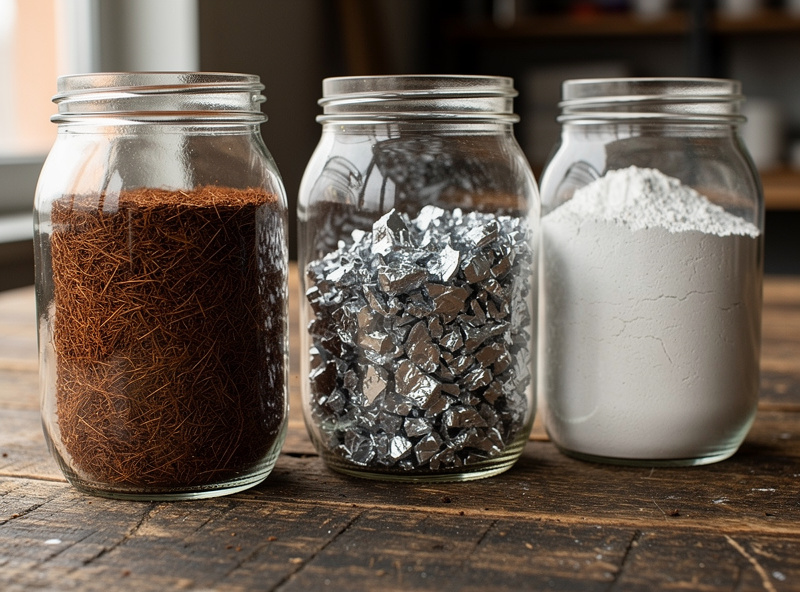
CVG substrate is a 2:1:0.1 mix of coconut coir, vermiculite, and gypsum hydrated to field capacity. The recipe yields a sterilization-friendly bulk substrate with strong water retention, balanced porosity, and built-in calcium for monotub mushroom growing. Most cultivators use 650g coir, 325g vermiculite, and 25g gypsum per 6-quart tub.
CVG is one of my five working recipes — the others (supplemented hardwood, pasteurised straw, hardwood logs, rice broth for cordyceps) are all detailed in my mushroom substrate guide.
CVG earned its place as the default home-cultivator bulk substrate because of one simple advantage: it does not need pasteurization. Pour-and-stir hot water makes the coir fully hydrated and clean enough for grain spawn to outpace contamination. That removes the pressure cooker step from bulk substrate prep and turns what could be a multi-hour job into a 30-minute kitchen task. The trade-off is recipe precision — get the ratios wrong and you fight contamination instead of growing.
The Standard CVG Recipe by Weight and Volume
The widely-tested CVG ratio is 65% coco coir, 32% vermiculite, and 3% gypsum by dry weight. For a single 6-quart shoebox monotub: 650g compressed coir, 325g coarse vermiculite, 25g powdered gypsum, and roughly 4 liters of boiling water. That hydrates one full tub to field capacity with about 100g of finished substrate left over for top-off.
The full ingredient breakdown:
As an Amazon Associate I earn from qualifying purchases.
- Coco coir: 650g compressed brick, food-grade or hydroponic grade. Avoid garden-store coir — soaps and fertilizer residue kill mycelium.
- Vermiculite: 325g, coarse or medium grade only (fine vermiculite compacts and starves mycelium of oxygen).
- Gypsum: 25g powdered, food-grade calcium sulfate. Technically optional, but it noticeably improves substrate buffering and pin consistency in my own tubs — I don’t skip it.
- Water: Roughly 4 liters boiling. Tap water with chlorine evaporates during cooling; well water and RO water both work fine.
The dry mix weighs 1,000g and finishes at roughly 4.5 kg hydrated. That fills a 6-quart shoebox monotub to a 4-inch depth, the depth most species fruit at without overlay or stalling. For a 12-quart tub, double everything; for a 32-quart tote, scale by 5.
Why These Three Ingredients
Coco coir provides cellulose and structure, vermiculite holds water in its laminated mineral pockets, and gypsum supplies calcium that buffers pH drift while triggering stronger pinning. Each plays a distinct role — drop one and the substrate fails differently. CVG is the smallest stable ratio that survives a contamination challenge from grain-to-spawn ratio mistakes.
The function each ingredient performs:
- Coco coir: Cellulose carbon source for mycelium. Provides structure that prevents the substrate from collapsing into mud after misting cycles.
- Vermiculite: Water-retention reservoir. Releases moisture slowly through fruiting; prevents the surface drying that aborts pins.
- Gypsum: Calcium sulfate buffer. Holds substrate pH in the mycelium-friendly 6.0-6.5 range and gives more even pinning than a gypsum-free batch, in my experience running both side by side.
- Hot water: Hydration plus a pasteurization-equivalent thermal kill on most opportunistic molds in the coir.
Skipping gypsum produces a usable substrate but yields drop and pins form unevenly. Replacing vermiculite with perlite produces a too-dry mix that needs daily misting. Substituting peat moss for coir works but the mycelium runs slower and pins later. The three-ingredient ratio is intentional, not arbitrary. For substrate alternatives, see our breakdown of coffee ground mushroom substrate.
Step-by-Step CVG Hydration Method
Hydrate CVG by pouring boiling water over the coir brick in a heat-safe bucket, sealing with a lid for 60-90 minutes, then stirring in the vermiculite and gypsum once the mix is below 80°F. The whole process takes about 2 hours of mostly hands-off time. No pressure cooker, no pasteurization step.
- Weigh dry ingredients into a 5-gallon bucket. Compressed coir bricks first, vermiculite and gypsum on top.
- Boil water and pour 4 liters over the brick. The brick will sizzle and steam; that is intended pasteurization heat.
- Seal the bucket lid and wait 60-90 minutes. The brick fully expands and the residual heat kills mold spores in the surface layer.
- Stir thoroughly with a clean spoon. Break up clumps; the vermiculite should distribute evenly through the dark coir.
- Cool to under 80°F before inoculation. Test with the back of your hand — comfortably warm, not hot.
- Verify field capacity. Squeeze a handful as hard as possible. Two to three drops should fall, no stream. If a stream falls, the mix is too wet — add more dry vermiculite.
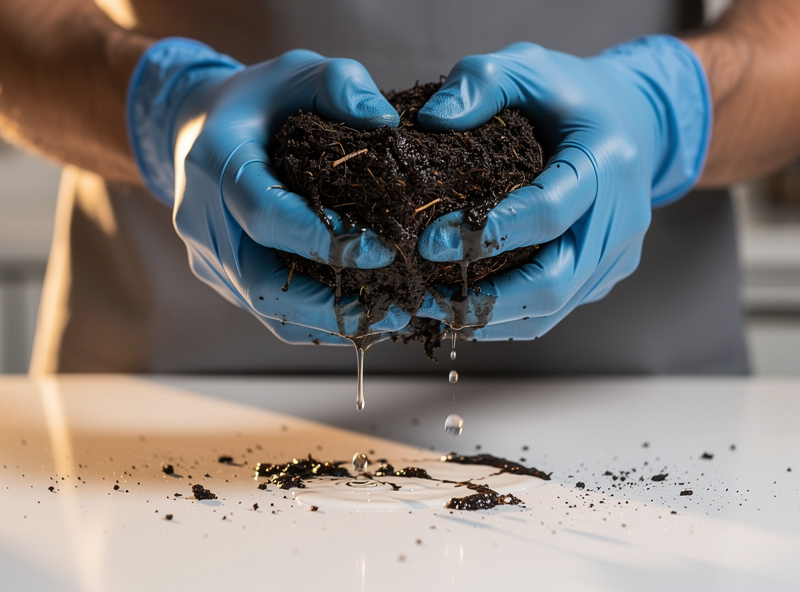
The squeeze test is the only humidity check that matters. Hygrometer readings on freshly mixed substrate are unreliable because of evaporation gradients. The “two to three drops” rule is the standard I’ve used on every CVG batch I’ve mixed, and it’s the widely-shared benchmark across the home-cultivation community. Get the squeeze test right and most other variables forgive themselves.
CVG in My Own Rotation
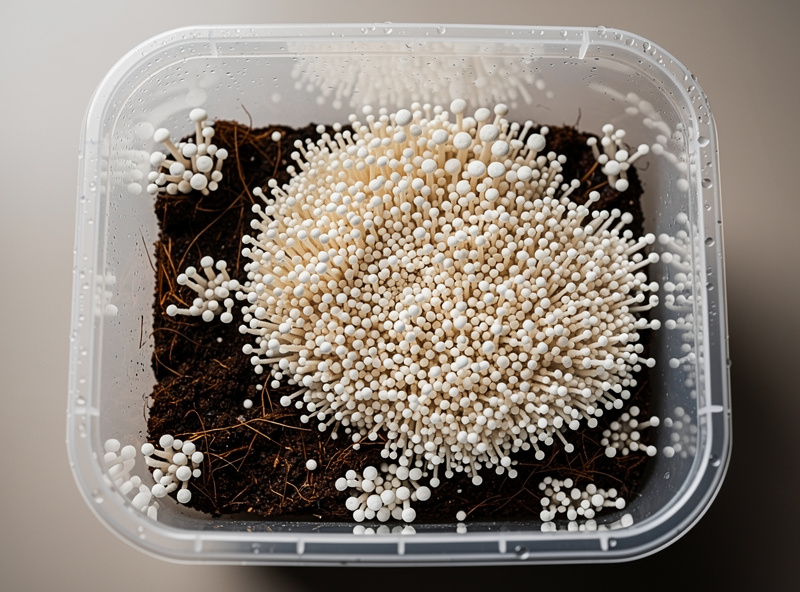
CVG is my go-to bulk substrate for oyster mushrooms specifically — it’s the workhorse mix on my shelf, the one I reach for when I want a tub running with minimal fuss. Commercial gourmet-mushroom suppliers sell pre-mixed CVG bags for exactly this reason: it’s a convenience-first bulk substrate that skips pressure sterilization while still holding up to contamination pressure, which North Spore’s own CVG product listing confirms is the standard positioning of this substrate in the gourmet cultivation supply trade, not just a home-grower shortcut.
Where CVG falls short of straw or supplemented sawdust is peak yield per pound of substrate — I still run pasteurized straw when oyster yield is the priority and CVG when convenience is. Lion’s mane and king oyster, by contrast, do better on Masters Mix in my experience; I don’t run them on CVG.
Mixing Spawn Into CVG (Spawn-to-Substrate Ratio)
Mix grain spawn into hydrated CVG at a 1:2 ratio by volume — one quart of fully colonized grain per two quarts of CVG. Higher ratios (1:1) speed colonization but waste grain. Lower ratios (1:3 or 1:4) save grain but increase contamination risk. Most home growers settle at 1:2 as the sustainable balance.
The trade-offs across spawn ratios:
- 1:1 (high spawn): Colonization in 5-7 days. Wasteful grain use. Best for valuable strains where speed beats cost.
- 1:2 (standard): Colonization in 10-14 days. The most-tested home-grow ratio. Strong contamination resistance.
- 1:3 (low spawn): Colonization in 18-25 days. Stretches grain budget but the longer race against contamination raises failure rate.
- 1:4 or higher: Routinely fails. Not recommended without flow-hood-clean spawn and pasteurized substrate.
Mix the grain spawn into the CVG by hand wearing fresh nitrile gloves. Break up grain clumps so individual kernels distribute through the substrate — clumped spawn produces uneven colonization and creates contamination-friendly pockets. Read more about beginner ratio mistakes in our guide on mushroom growing mistakes every beginner makes.
Common CVG Mistakes and Fixes
The four mistakes that kill CVG grows: under-hydrating the coir (too dry by 5-10%), over-hydrating to soup texture, skipping the gypsum, and using fine grade vermiculite instead of coarse. Each shows a distinct symptom 2-4 weeks into the grow.
Symptom-to-cause mapping:
- Substrate dries out within a week of fruiting: Vermiculite ratio too low or fine-grade vermiculite collapsed. Re-mix with coarse vermiculite at 32% by weight.
- Standing water at the bottom of the tub: Over-hydrated. Drain the bottom or add 100-200g dry vermiculite next batch.
- Slow uneven pin formation: Gypsum was skipped or the substrate has gone alkaline. Add a light gypsum top dressing or restart with fresh CVG.
- Aerial mycelium climbing the walls: Substrate too wet, FAE too low. Open the lid for 30-60 seconds twice a day; reduce future water by 200ml.
- Green or black mold appearing within a week: Bottom-of-bucket cold spot or under-pasteurized coir. Use boiling water (not just hot tap water) and seal the bucket immediately.
The reliable failure-recovery move is starting fresh rather than rescuing — CVG ingredients cost about $4 per tub and the time saved compared to fighting a marginal substrate makes the math obvious. CVG is forgiving when mixed correctly and brutal when ratios drift. For the full workflow that puts this substrate to work — build the tub, spawn it, manage gas exchange, and harvest flush after flush — the monotub bulk growing guide is the next step.
Frequently Asked Questions
Do I need to pasteurize CVG substrate?
No. The boiling-water-over-coir-brick step provides enough thermal kill on opportunistic mold spores at the substrate surface, and grain-spawn mycelium colonizes faster than the residual contaminants can establish. CVG is specifically designed as a no-pasteurize bulk substrate for monotubs.
Can I use perlite instead of vermiculite in CVG?
Not at the same ratio. Perlite holds far less water than vermiculite, so a perlite-CVG mix dries out within days of fruiting. If you must substitute, use only 50% of the perlite by weight and add 100g extra coir, but expect lower yields than the standard recipe.
What if I do not have gypsum?
You can run CVG without gypsum and still get usable yields, just expect a noticeably lower harvest weight and more uneven pinning based on my own side-by-side batches. Gypsum costs about a dollar per pound and one bag will mix dozens of monotubs, so it is worth ordering. Calcium carbonate is not a substitute.
How long does CVG substrate last in storage?
Hydrated CVG should be inoculated within 24 hours. Dry CVG ingredients store indefinitely in sealed containers. Pre-hydrated unmixed CVG starts to grow opportunistic molds within 48-72 hours even refrigerated, so mix only what you can spawn that day.
Is CVG good for oyster mushrooms?
Yes, but oyster mushrooms perform best on pasteurized straw or supplemented sawdust. CVG works for oyster grows when convenience matters more than peak yield. Lion’s mane and most other gourmet home-grown species fruit excellently on standard CVG.
Can I reuse spent CVG substrate?
Spent CVG can be broken up and added to outdoor garden beds where it slowly continues to fruit and improves soil organic matter. Indoor reuse is not recommended because the spent substrate is contamination-loaded and outcompetes fresh spawn.