
Agar is the step most home growers skip for too long, and it is the one that finally took my contamination rate from “rolling the dice” to “boringly reliable.” The reason is simple: agar is the only place in the whole cultivation chain where you can actually see what is growing before it ever touches grain. A spore syringe or a liquid culture is a black box — you find out it was contaminated when your grain jar goes sour a week later. On a clear agar plate, a bacterial smear or a green mold colony announces itself in two days, on a surface you can inspect, isolate, and clean up. That visibility is the entire point.
This is the beginner-friendly version of how I run agar: the gear, pouring plates, transferring clean, and using the plate to clean up a culture rather than just store it. None of it is hard once you have done it a few times — it is just fussy about cleanliness, and that fussiness is the skill.
Why agar earns its place
Three jobs make agar worth the setup. First, contamination screening: you germinate a spore print or syringe onto a plate and watch — any bacteria or competing mold shows up next to the mycelium where you can see and reject it, instead of carrying it forward blind. Second, isolation and cleanup: if a plate comes up part-mycelium, part-contaminant, you cut a clean wedge of pure mycelium from the leading edge and transfer it to a fresh plate, walking the culture toward purity over a couple of generations. Third, a culture library: a clean plate, sealed and refrigerated, is a living backup of a strain you like. For a deeper look at how this fits against the alternatives, my liquid culture vs. spore syringe breakdown covers when each makes sense.
What you actually need
Less than people assume. The core kit:
- Agar medium. Malt extract agar (MEA) or light malt extract agar (LME) is the standard beginner pour — nutritious, easy, and what nearly every gourmet species likes. You can buy pre-mixed agar powder and just add water.
- Petri dishes. Sterile pre-poured-empty plastic dishes are cheapest and easiest for home use; glass plates work if you will sterilize them yourself.
- A pressure canner to sterilize the agar (yes, the same one you run grain in — agar must hit 15 PSI / 121 °C too).
- A still-air box (SAB) or a laminar flow hood. Agar transfers are the moment a flow hood truly pays for itself; a SAB will get you started.
- A scalpel and a flame source (alcohol lamp or torch) for flame-sterile transfers, plus 70% isopropyl for everything else.
Which agar should a beginner pour?
You do not need an exotic recipe to start. Here is how the common media compare for a home grower:
| Medium | What it is | Best for |
|---|---|---|
| MEA / LME | Malt extract agar | The all-purpose beginner default — start here |
| PDA | Potato dextrose agar | Vigorous growth; common and well-liked |
| DFA | Dog-food agar (cheap protein) | Budget plates; works surprisingly well |
| Antibiotic-amended | Agar + a bacteriostatic additive | Cleaning up a stubbornly bacterial culture (advanced) |
Ignore the last row until you need it. MEA, poured well and worked cleanly, covers everything a beginner does.
Pouring plates without contaminating them
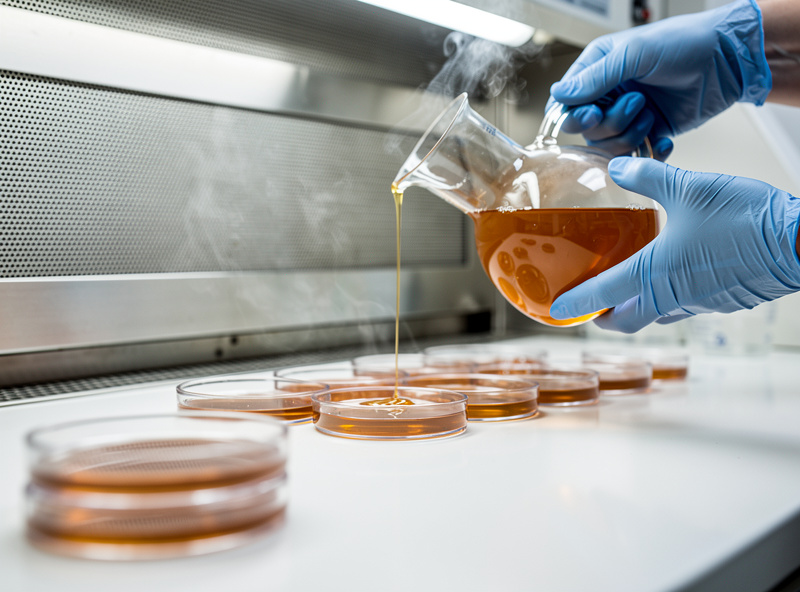
Mix the agar powder with water to the package ratio in a flask or jar, cap it loosely with foil, and pressure-sterilize at 15 PSI for the time on the package (commonly 30–40 minutes for a small volume). Let it cool until you can comfortably hold the flask — roughly 50–55 °C, hand-warm, not steaming. Too hot and you cook condensation onto the lids; too cool and it sets before you pour.
Then pour in front of the flow hood (or inside the SAB): lift each dish lid just enough, pour a shallow layer to cover the bottom, and re-cover immediately. Work fast and keep your hands and the open plate within the clean air stream. Let the plates set, then leave them lid-down (inverted) so condensation drips off the lid rather than onto the agar surface. I leave a few poured plates to incubate empty for a day as a sterility check — if any cloud over, my technique slipped and I find out before I waste a culture.
The transfer: where it all comes down to technique
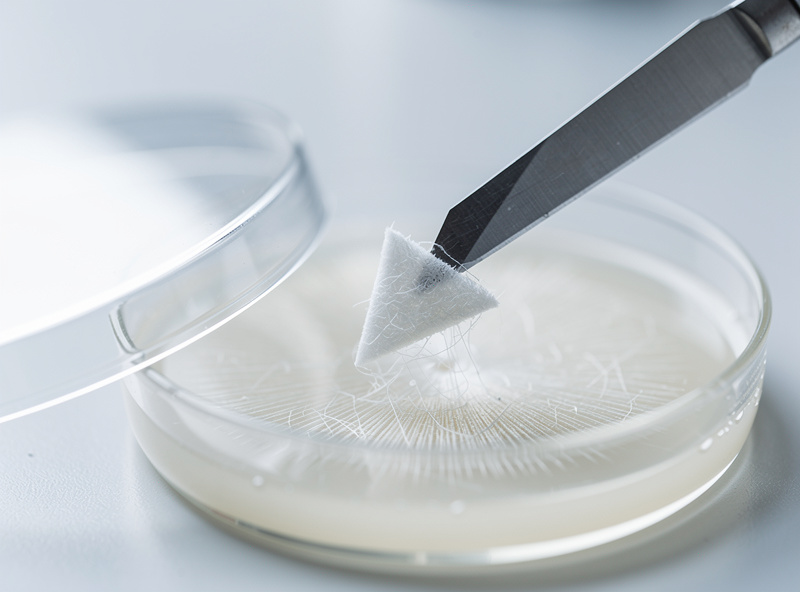
Transferring is moving a piece of mycelium from one plate (or from a colonized substrate) to a fresh plate. The whole game is doing it without letting anything else in:
- Wipe down the SAB or hood surface and your gloves with 70% isopropyl. Lay out the source plate and the fresh plate.
- Flame the scalpel blade red in the alcohol lamp or torch, then let it cool for a few seconds — a red-hot blade kills the very mycelium you are about to move.
- Open the source plate just enough, cut a small wedge (a few millimeters) from the leading edge of clean, actively growing mycelium — not the center, and never from anywhere near a contaminant.
- Lift the wedge, open the fresh plate minimally, and place the wedge mycelium-side-down near the center. Re-cover immediately.
- Re-flame the scalpel between every cut. Label the plate with strain and date.
Seal finished plates with a strip of micropore tape or parafilm and incubate them somewhere clean and stable — the same dark, temperature-steady shelf I colonize grain on works fine. Most gourmet species are happy colonizing agar in the low-to-mid 20s °C; I keep the shelf out of direct sun and check plates daily for the first few days, because that early window is when a contaminant is small enough to isolate around and large enough to spot. Inverted storage matters here too — a plate left lid-up collects condensation on the agar surface, and that film of water is a runway for bacteria to spread across the plate faster than the mycelium can claim it.
One habit that has saved me more cultures than any single piece of gear: I never open a plate I have not first inspected through the closed lid under good light. If I can see a contaminant before I crack the seal, I decide my cut — or my discard — before any air moves over the agar. Opening first and looking second is how a clean culture picks up the contaminant from the plate right next to it.
Using agar to clean up a culture
This is agar’s quiet superpower and the reason I run it even for strains I already have. If a plate or a syringe is faintly contaminated — a little bacterial sheen, a spot of mold — you do not have to throw the genetics away. You transfer a clean wedge from the part of the colony furthest from the contaminant onto a fresh plate. The mycelium grows out ahead of the slower contaminant, and after one or two of these “sectoring” transfers you have walked an isolated, clean culture out of a dirty start. Done patiently, agar turns a marginal culture into a reliable one — which is exactly the kind of save you can never make once that culture is buried in grain. And it is the same logic that protects every other patient-microbial corner of the workshop: isolate the clean line, discard the rest, never compromise the source.
From a clean plate, the path forward is straightforward: a wedge into a liquid culture jar or straight onto sterilized grain. If your grain prep is not yet dialed, get that solid first — my routine for sterilizing grain spawn is the natural next link, and the contamination guide ties the whole chain together. If a plate does come up bacterial, the wet-spot diagnosis guide will tell you what you are looking at.
Frequently Asked Questions
What agar is best for beginners growing mushrooms?
Malt extract agar (MEA) or light malt extract agar is the standard beginner default. It is nutritious, easy to pour, and suits nearly every gourmet species. You can buy pre-mixed agar powder and just add water before pressure-sterilizing. Save antibiotic-amended media for cleaning up stubbornly bacterial cultures later.
Do I need a flow hood to work with agar?
A still-air box will get you started, but agar transfers are exactly where a laminar flow hood pays for itself. The open plate is exposed for several seconds per transfer, and moving air over a clean surface dramatically lowers airborne contamination. Begin in a SAB and upgrade to a hood as you do more plate work.
How do I sterilize agar?
Mix agar powder with water to the package ratio, cap the flask loosely with foil, and pressure-sterilize at 15 PSI for the time on the package, often 30 to 40 minutes for a small volume. Let it cool to hand-warm, roughly 50 to 55 degrees Celsius, before pouring plates in front of a flow hood or in a still-air box.
Why do I flame the scalpel before transferring?
Flaming sterilizes the blade so you do not carry contaminants onto the fresh plate. Heat it until it glows, then let it cool for a few seconds before cutting, because a red-hot blade will kill the mycelium you are trying to move. Re-flame between every cut to keep each transfer clean.
Can agar clean up a contaminated culture?
Often, yes. If a plate is only lightly contaminated, transfer a clean wedge from the part of the colony furthest from the contaminant onto a fresh plate. The mycelium outgrows the slower contaminant, and after one or two of these sectoring transfers you can isolate a clean culture from a dirty start without losing the genetics.