
The cardboard spawn method colonizes plain corrugated cardboard with oyster mycelium to multiply a small amount of spawn — or even a grocery-store oyster stem — into enough to inoculate a full tub. It costs the price of a shipping box, needs no sterilization, and works because corrugated cardboard is nearly pure cellulose, oyster’s native food.
I keep coming back to this method for one reason: it is the cheapest honest way to turn a $3 pack of oyster mushrooms into a grow. No canner, no grain, no flow hood — just damp cardboard and patience. It only works for oyster, and it carries a real contamination risk if you get sloppy, but done right it is the closest thing to free spawn a home grower has.
Here is what most tutorials skip and what will actually decide whether your stack goes white with mycelium or grey with mold: the cardboard itself. Get the material wrong and nothing else matters.
How Does the Cardboard Spawn Method Actually Work?
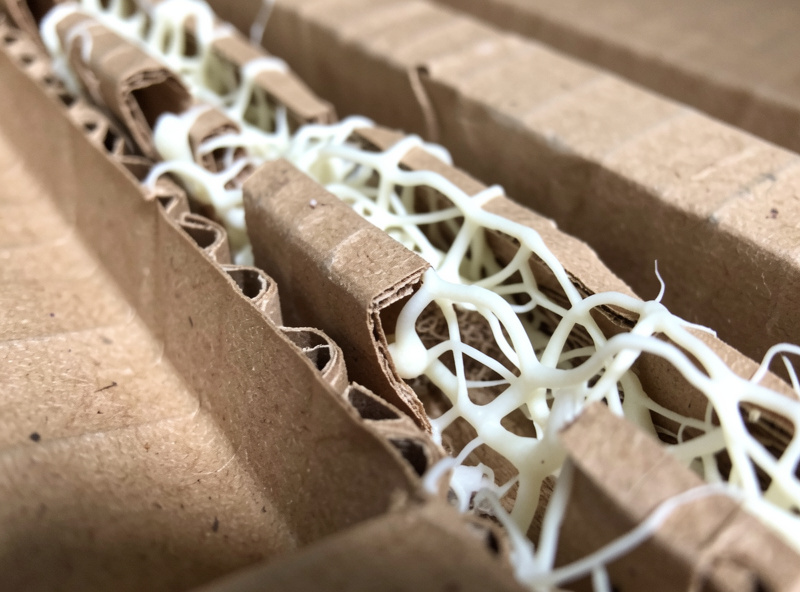
Oyster mycelium eats cellulose, and corrugated cardboard is roughly 90% cellulose with a fluted inner layer that holds moisture and gives mycelium room to run. You sandwich a piece of colonized tissue or spawn between damp cardboard sheets, keep it warm and dark, and the mycelium bridges from your starter into the board, consuming it over one to two weeks until the whole stack is webbed white.
The corrugation is the secret. Those internal flutes trap humid air and channel the rhizomorphic strands of oyster mycelium along their length — you can watch the white ropes follow the ridges. Flat, non-corrugated card does not work nearly as well because it lacks that internal structure and dries out fast. This is the same cellulose-loving behavior that makes oyster the correct gateway species overall, which is exactly why the broader grow mushrooms without a pressure cooker approach leans on oyster for everything.
What you are really doing is a low-tech transfer. In my grow room I do the same move on agar and in liquid culture with sterile technique; cardboard is the no-equipment version of the same idea — moving living mycelium onto fresh food so it multiplies. It is slower and riskier than a flow-hood transfer, but the biology is identical: give aggressive oyster mycelium clean cellulose and a head start, and it takes over.
What Kind of Cardboard Do You Need?
Use plain brown corrugated cardboard with no glossy printing, no wax coating, no plastic tape, and no heavy colored ink. A standard shipping box works perfectly. The glossy, waxed, and heavily printed stuff carries coatings and inks that can inhibit mycelium or introduce chemicals you do not want anywhere near food you plan to eat.
I sort cardboard the way I sort anything going near a substrate — ruthlessly. Peel off every strip of packing tape and every shipping label, because the adhesive is a mold magnet and the mycelium will not cross it. Avoid pizza boxes (grease), waxed produce boxes (the coating blocks moisture), and anything with a slick printed face. Plain kraft-brown board with visible corrugation when you tear the edge is exactly right.
Before it goes in the stack the cardboard gets a soak — 30 to 60 minutes in clean, near-boiling water that has cooled slightly, or a long soak in cool water if you would rather. The hot soak softens the glue holding the layers together (making it easy to peel apart to expose the flutes) and gives a light pasteurizing knock to whatever is on the surface. Then you drain it to damp-not-dripping. I made the mistake early on of using cardboard straight from a soggy recycling bin without cleaning it — it went to bacterial slime in three days and stank of sour mildew. Clean board, clean soak, every time.
Can You Use a Grocery-Store Oyster as Your Starter?
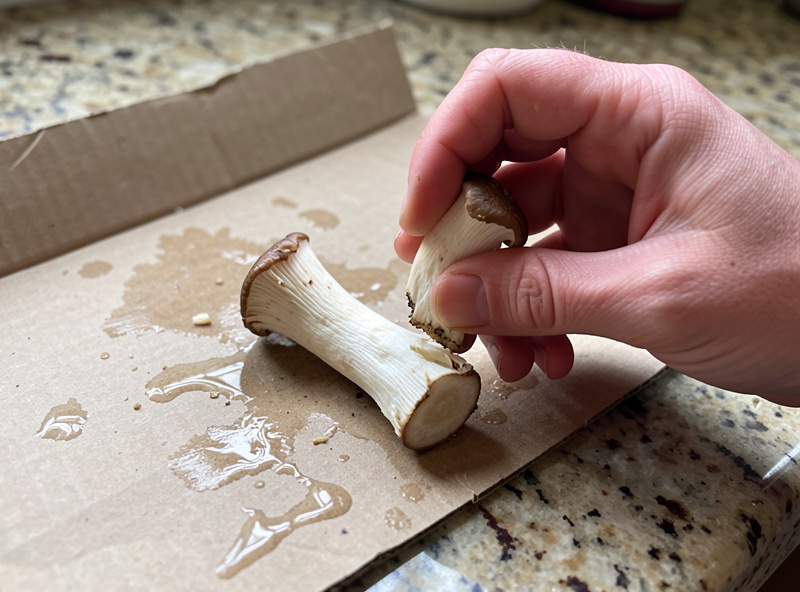
Yes — the stem butts of a fresh grocery-store oyster cluster are living tissue you can clone onto cardboard. Tear (do not cut) the base of the stems where they were joined, press those torn butts against damp cardboard, and the mycelium still living in that tissue will often bridge into the board. It is the ultimate zero-cost start, though success is less certain than using real spawn.
The key is freshness and the tear. Buy the freshest, firmest oyster cluster you can find — a limp, watery pack has less viable tissue. Tearing rather than slicing exposes clean internal cells rather than smearing surface contaminants across a cut face. The very base, the dense knot where all the stems meet, holds the most vigorous tissue. Press a few of those torn butts flute-side down onto your damp cardboard, layer more cardboard on top, and wait.
Be honest with yourself about the odds: grocery oyster is not sterile, it has been handled and refrigerated, and maybe half to two-thirds of attempts take cleanly. That is fine — it is free. When you already own a bag of proper oyster grain spawn, use a spoonful of that instead; the take rate jumps and the mycelium runs faster. Either way, the multiplication is the point. A single successful cardboard stack becomes the starter for the next stack, and so on. Cornell’s small-farms mushroom program is a good grounding in oyster’s biology if you want the why behind the vigor (Cornell Small Farms).
How Do You Build and Colonize the Stack?
Layer damp cardboard and starter material in a clean plastic container or zip bag: a sheet of cardboard, spawn or torn tissue spread across it, another sheet, more spawn, and so on, ending with cardboard on top. Keep it in the dark at room temperature (about 20–24°C / 68–75°F), and full colonization takes roughly 10–18 days depending on how much starter you used.
Moisture management is the whole job during colonization. The cardboard should stay damp like a wrung-out sponge — never dripping, never crisping dry. I use a cheap clear deli container with the lid resting on loosely for a little gas exchange, and I peek without disturbing the stack. If condensation pools in the bottom, tip it out; standing water breeds bacteria. If the top sheet dries, mist it lightly. Warmth and darkness do the rest.
You will know it is working when the surface and the torn edges show that bright, cottony-to-ropey white — healthy oyster mycelium smells faintly of fresh mushroom and clean earth. If instead you see green developing from a central point, that is Trichoderma, and that stack is done; bag it and bin it, because the spores spread. Wispy grey growth is cobweb mold, and a sour or ammonia smell means bacteria took hold — usually from too-wet cardboard. A fully colonized stack can be torn into chunks and used to inoculate pasteurized straw or coir directly, or layered into a fresh, larger cardboard build to multiply again.
What Are the Real Limits of Cardboard Spawn?
Cardboard spawn works for oyster and essentially nothing else, it is slower than grain spawn, and it carries more contamination risk because nothing in the process is sterile. It is a multiplication and bulking tool, not a substitute for a clean grain-spawn chain when you want to grow fussier species. Treat it as the cheap on-ramp it is.
Why oyster only? Because oyster is aggressive enough to outrun contaminants on a non-sterile medium — lion’s mane, shiitake, and the rest simply are not, and they will lose the race on cardboard every time. Cardboard also carries far less nutrition than grain, so mycelium colonizing it is less vigorous when you finally transfer it to substrate; you are trading raw spawn quality for zero cost. And because you never sterilized anything, your failure rate will always be higher than a canner-based chain — expect to lose some stacks and do not take it personally.
Set against those limits, the upside is real. For the cost of a box you would recycle anyway, you can bootstrap a first oyster grow with no specialized gear, and each success feeds the next. It fits the same clean-process discipline I run across every microbial hobby on the bench — the contamination instinct that protects the sourdough starter and the salami chamber protects a cardboard stack too. Once you have proven you can take an oyster from grocery pack to fruiting tub this way, the whole low-tech pipeline in the no-pressure-cooker guide opens up. Penn State Extension’s mushroom resources are worth a read when you are ready to weigh this against a proper spawn workflow (Penn State Extension).
How Do You Turn Colonized Cardboard Into a Real Harvest?
Once a stack is fully white, tear it into rough chunks and mix it through pasteurized straw or hydrated coir at roughly a 1:5 to 1:10 ratio of colonized cardboard to bulk substrate, the same way you would use grain spawn. The cardboard chunks act as inoculation points; the mycelium jumps from the board into the fresh substrate and colonizes the whole mass over the next one to two weeks.
The move that saves a batch here is speed and cleanliness at transfer. Have your pasteurized straw drained to field capacity and ready before you open the colonized stack, work on a wiped-down surface, and mix the torn cardboard through the substrate quickly so the young mycelium is not sitting exposed to room air any longer than necessary. Pack it into a clean tub or a bag with a few filter-taped holes, and back to the dark it goes. I keep a spray of 70% isopropyl on the bench and hit my hands and the table before I open anything — that reflex, carried over from agar work, is worth more than any single piece of gear.
You can also skip bulk substrate entirely for a tiny grow and simply fruit a well-colonized cardboard stack itself — a dense enough block of colonized corrugated will throw a small flush of oyster if you introduce it to humidity, light, and fresh air. Yields are modest because cardboard holds far less nutrition and mass than straw, but it proves the concept end to end with nothing but boxes. For a real harvest, though, use the cardboard to inoculate straw or coir and let the bigger substrate do the heavy lifting. From there you are into fruiting, which is its own discipline covered across the low-tech cluster.
Does the cardboard spawn method really work?
Yes, for oyster mushrooms. Corrugated cardboard is about 90 percent cellulose, which is oyster’s native food, so oyster mycelium colonizes damp clean cardboard readily. It works reliably for multiplying oyster spawn but not for other gourmet species, which are not aggressive enough to succeed on a non-sterile medium.
What kind of cardboard should I use for growing mushrooms?
Plain brown corrugated cardboard with no glossy printing, wax coating, plastic tape, or heavy ink. A standard shipping box is ideal. Remove all tape and labels first, and avoid pizza boxes, waxed produce boxes, and slick printed surfaces because coatings and adhesives inhibit mycelium.
Can I grow mushrooms from a store-bought oyster mushroom?
Yes. Tear the stem butts of a fresh oyster cluster and press the torn tissue against damp cardboard. The living mycelium in that tissue can bridge into the board. Success is less certain than using proper spawn, roughly half to two-thirds of attempts, but it costs nothing.
How long does cardboard spawn take to colonize?
Roughly 10 to 18 days at room temperature, about 20 to 24 degrees Celsius, kept dark and damp like a wrung-out sponge. The amount of starter material you use is the main factor. More spawn or tissue means faster and more reliable colonization.
Is cardboard spawn as good as grain spawn?
No. Cardboard carries less nutrition than grain, so the resulting mycelium is less vigorous, and because nothing is sterilized the contamination risk is higher. Cardboard is a cheap multiplication and bulking tool for oyster, not a replacement for a clean grain-spawn chain for fussier species.
Related Reading
- How to Grow Mushrooms Without a Pressure Cooker — the full low-tech pipeline this method feeds into.
- Cold Lime-Bath Pasteurization — pasteurize the straw you inoculate with cardboard-grown spawn.
- Passive FAE: Fruiting Without a Fan or Controller — fruit the block once it is colonized.
- Windowsill Mushroom Growing — what’s realistic once you have spawn to work with.
- A Low-Budget First Grow — how cardboard spawn fits into a full grow under $50.